How to make Custom Tool Models#
This page provides a detailed walkthrough on how to create a mod with
a custom handheld tool model by modifying an existing one.
In this example we will create a modified version of the gatling gun
and add a duck statue to one of its barrels.
Now, even though this example only shows one specific thing (the gatling gun),
the knowledge from this can be applied to most other tool models without any problems.
An example mod that was created for this tutorial is linked at the bottom.
If you did everything right, at the end your mod should have the same content as the example mod.
Table of Contents#
- Required Resources - Things you need to follow this tutorial
- Creating an example Mod - Creating the mod that will contain the custom tool
- Creating the required Files - Copying/creating important files and folders
- Preparing the files - Preparing the created files
- The Lua Script - Preparing the tool's Lua script
- The renderables - Preparing the renderable files
- Editing the model - Making changes to the gatling gun's barrel model
- Converting to FBX - Converting the DAE model to FBX
- Loading and editing it in Blender - Loading it in Blender and making changes to it
- Importing the model - Importing the model
- Adding the duck - Adding the duck to the barrel
- The important part - What comes next is very important
- Checking the UV Map(s) - Making sure the UV Map is correct
- Joining the models - Properly joining the duck and barrel together
- Exporting the model and fixing the DAE - Exporting the model properly
- Converting it again - Converting it back to DAE
- Fixing the DAE - Editing the converted DAE to make it work
- Setting up the renderables - Setting up the gun's renderable files
- Creating a preview model and renderable - Creating the inventory preview
- Creating the preview model - Creating the model for the preview
- Setting up the preview renderable - Setting up the inventory preview renderable
- Adding a name, description and icon - Creating the inventory description and icon
- The name and description - Adding the name and description
- The icon - Creating the icon
- Some problems and their causes - Some problems and possible causes for them
Required Resources#
- Scrap Mechanic
- Scrap Mechanic Mod Tool
- Blender
- Visual Studio, VS Code or any other program that can edit and format XML files.
NOTE - Do NOT try to use an "online XML formatter" website, it will cause problems. - Autodesk FBX Converter
- Basic knowledge of JSON and XML files/data structure
| Game Files |
|---|
| Scrap Mechanic/Data/Character/Char_Tools/char_spudgun_spinner_preview.rend |
| Scrap Mechanic/Data/Character/Char_Tools/Char_spudgun/char_spudgun_spinner_preview.fbx |
| Scrap Mechanic/Data/Character/Char_Tools/Char_spudgun/Barrel/Barrel_spinner/char_spudgun_barrel_spinner.rend |
| Scrap Mechanic/Data/Character/Char_Tools/Char_spudgun/Barrel/Barrel_spinner/char_spudgun_barrel_spinner_geo.dae |
| Scrap Mechanic/Data/Objects/Mesh/decor/obj_decor_babyduck.fbx |
| Scrap Mechanic/Survival/Scripts/game/tools/PotatoGatling.lua |
Creating an example Mod#
The first thing we need to do to add a custom tool is, create a mod that will contain the tool.
In this example we're creating a Blocks & Parts mod but the process is basically the same for custom games.
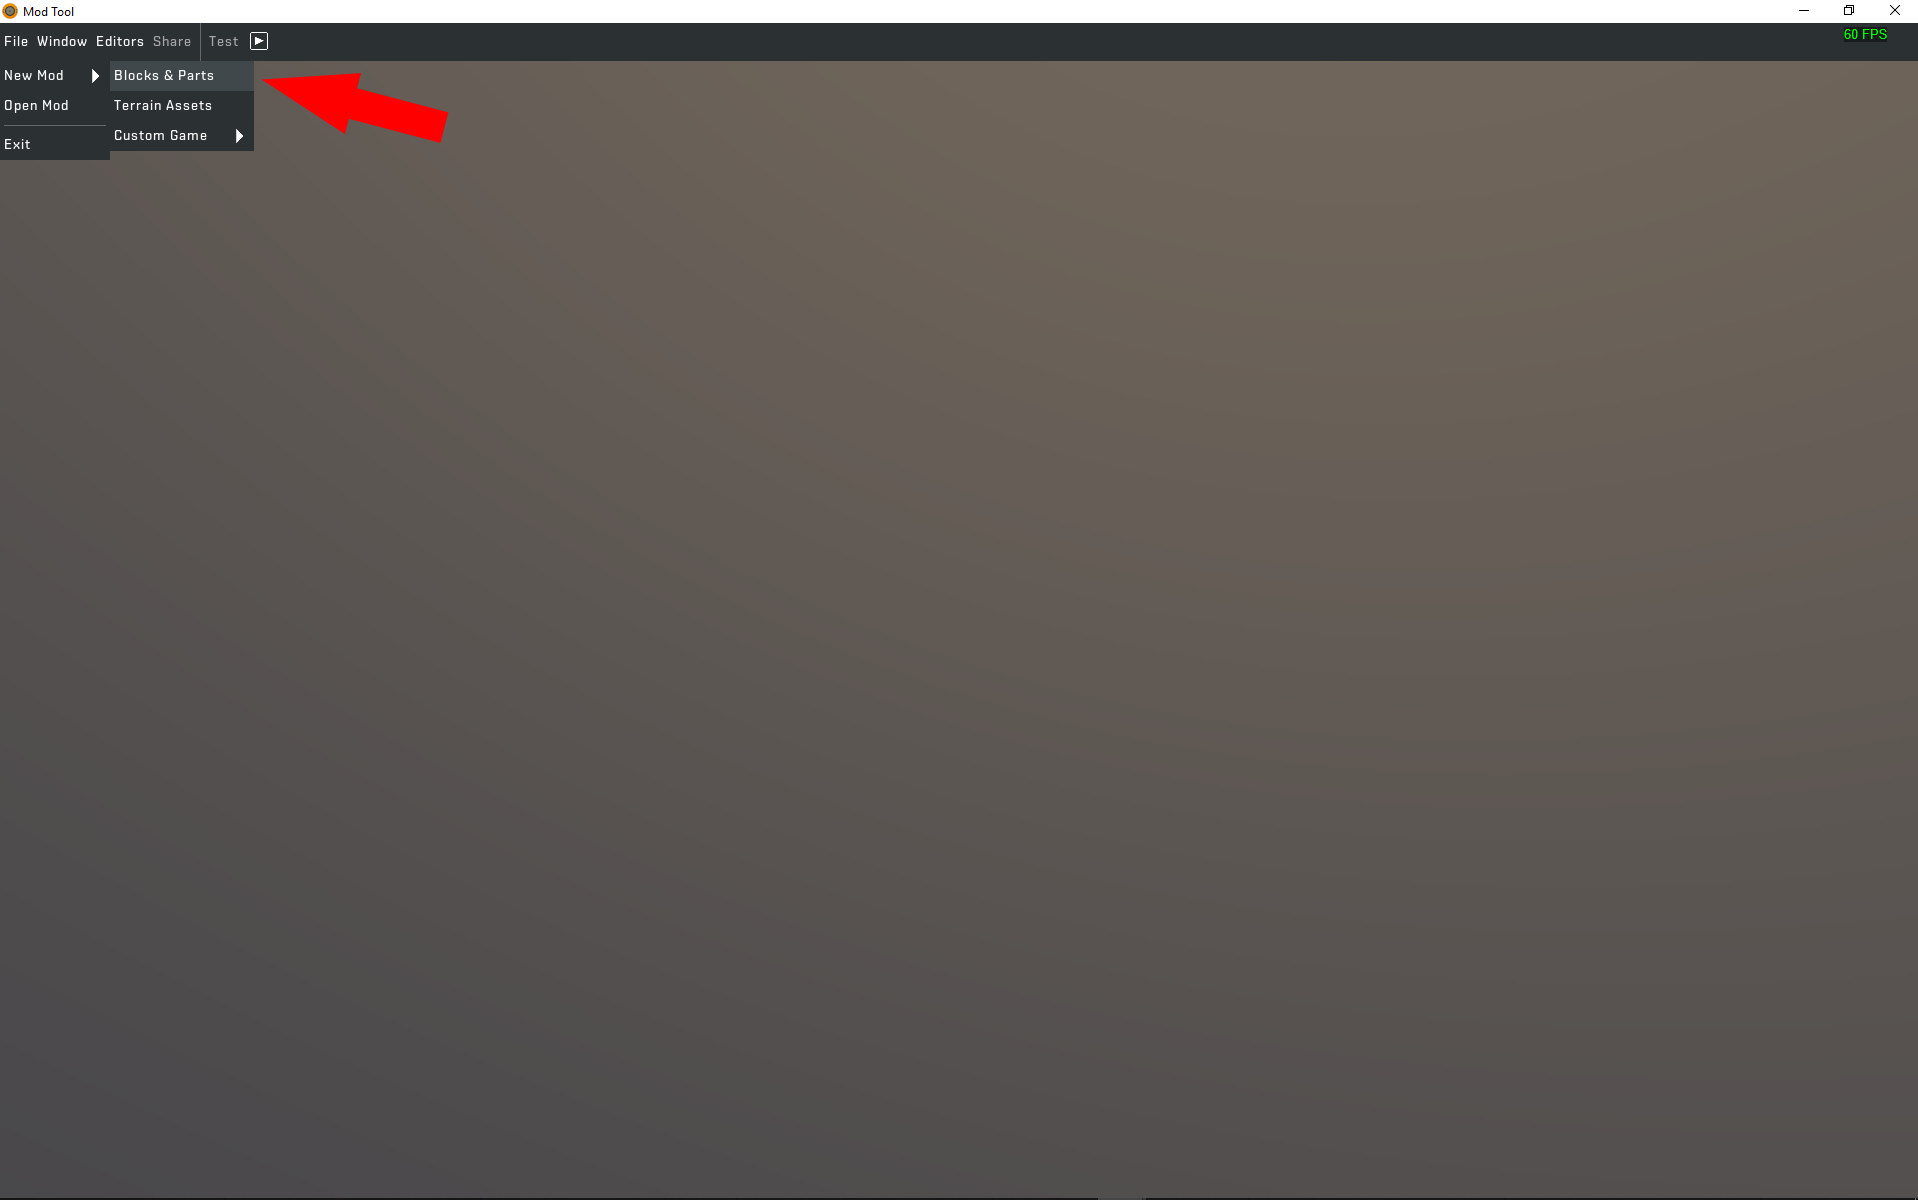
To do this, launch the Scrap Mechanic Mod Tool and, at the top left, click on File, New Mod, Blocks & Parts.
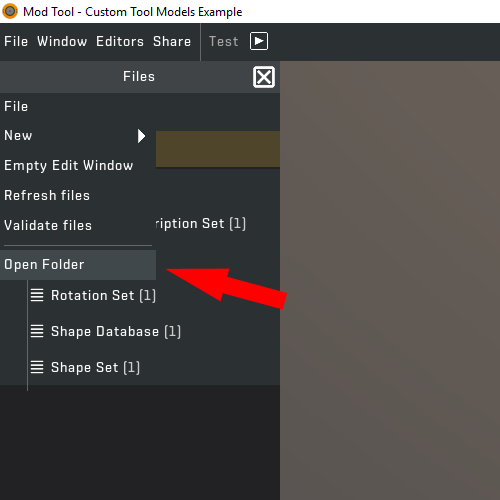
After creating the mod, open its folder by clicking on File on the left, then Open Folder.
The opened folder should look like this:

Creating the required Files#
In this folder, we now need to add some folders and files:
First, create a folder called Scripts and copy
this file from the game: Scrap Mechanic/Survival/Scripts/game/tools/PotatoGatling.lua
into that folder.
Then, create a folder called Tools inside the main mod folder.
Inside the Tools folder, create two new folders called Database and ExampleGun.
Open the Database folder and inside it, create a folder
called ToolSets and a file called toolsets.tooldb.
Open the toolsets.tooldb file in any editor that can work with JSON and
copy/paste the following data into it:
{ "toolSetList": [ "$CONTENT_DATA/Tools/Database/ToolSets/tools.json" ]}After that, open the ToolSets folder you created and inside it, create
a file called tools.json.
Then, open the created file and copy/paste this data into it:
{ "toolList": [ { "uuid": "00000000-0000-0000-0000-000000000000", "previewRenderable": "$CONTENT_DATA/Tools/ExampleGun/ExampleGun_preview.rend", "previewRotation": [ 1, 0, 0, 0, -1, 0, 0, 0, -1 ], "script": { "file": "$CONTENT_DATA/Scripts/ExampleGun.lua", "class": "ExampleGun" } } ]}note
The UUID above is a nil UUID and you need to replace it with a new one before continuing.
A new UUID can be generated in the mod tool or on https://uuidgenerator.net.
Now, go back to the Tools folder and open the ExampleGun folder you created in it.
Copy the following files from the game into the ExampleGun folder:
Scrap Mechanic/Data/Character/Char_Tools/char_spudgun_spinner_preview.rendScrap Mechanic/Data/Character/Char_Tools/Char_spudgun/char_spudgun_spinner_preview.fbxScrap Mechanic/Data/Character/Char_Tools/Char_spudgun/Barrel/Barrel_spinner/char_spudgun_barrel_spinner.rendScrap Mechanic/Data/Character/Char_Tools/Char_spudgun/Barrel/Barrel_spinner/char_spudgun_barrel_spinner_geo.dae
Preparing the files#
Now we have to prepare some of the created files so they work properly later.
The Lua script#
Let's prepare the Lua script first:
Open the Scripts folder in your mod, rename the PotatoGatling.lua file
inside it to ExampleGun.lua and open it in any text/code editor.
Replace all instances of PotatoGatling in the file with ExampleGun.
At the top of the file there should be a table setting the gun's renderables, like this:
local renderables = { "$GAME_DATA/Character/Char_Tools/Char_spudgun/Base/char_spudgun_base_basic.rend", "$GAME_DATA/Character/Char_Tools/Char_spudgun/Barrel/Barrel_spinner/char_spudgun_barrel_spinner.rend", "$GAME_DATA/Character/Char_Tools/Char_spudgun/Sight/Sight_spinner/char_spudgun_sight_spinner.rend", "$GAME_DATA/Character/Char_Tools/Char_spudgun/Stock/Stock_broom/char_spudgun_stock_broom.rend", "$GAME_DATA/Character/Char_Tools/Char_spudgun/Tank/Tank_basic/char_spudgun_tank_basic.rend"}Since we only want to modify the barrel of the gun, we only replace the barrel renderable:
"$GAME_DATA/Character/Char_Tools/Char_spudgun/Barrel/Barrel_spinner/char_spudgun_barrel_spinner.rend", with our own renderable:
"$CONTENT_DATA/Tools/ExampleGun/ExampleGun_barrel.rend",It should now look like this:
local renderables = { "$GAME_DATA/Character/Char_Tools/Char_spudgun/Base/char_spudgun_base_basic.rend", "$CONTENT_DATA/Tools/ExampleGun/ExampleGun_barrel.rend", "$GAME_DATA/Character/Char_Tools/Char_spudgun/Sight/Sight_spinner/char_spudgun_sight_spinner.rend", "$GAME_DATA/Character/Char_Tools/Char_spudgun/Stock/Stock_broom/char_spudgun_stock_broom.rend", "$GAME_DATA/Character/Char_Tools/Char_spudgun/Tank/Tank_basic/char_spudgun_tank_basic.rend"}The renderables#
Now we need to prepare the renderable files that we set up in our tools.json and ExampleGun.lua.
Open the Tools/ExampleGun/ folder in your mod folder.
In there, rename the following files:
char_spudgun_spinner_preview.rendchar_spudgun_spinner_preview.fbxchar_spudgun_barrel_spinner.rend
to these, in the same order (leave char_spudgun_barrel_spinner_geo.dae the way it is):
ExampleGun_preview.rendExampleGun_preview.fbxExampleGun_barrel.rend
We'll go about setting up those renderable files later, as we first have to actually
make our changes to the barrel model before we can add them to the renderable.
Editing the model#
Preparing the files was the easy part - Editing the actual model is a little bit harder.
Converting to FBX#
To change the gun's barrel, we need to edit the model in the char_spudgun_barrel_spinner_geo.dae file.
However, we can't import this file in blender as-is, as it will not load/render properly.
To load the model in blender, we first have to convert it to FBX using the Autodesk FBX Converter tool.
To do this, launch FBX Converter, drag + drop the char_spudgun_barrel_spinner_geo.dae file into the
left ("Source files") box, make sure the output format is set to FBX in "Binary" Save Mode (as shown below)
and click on Convert.
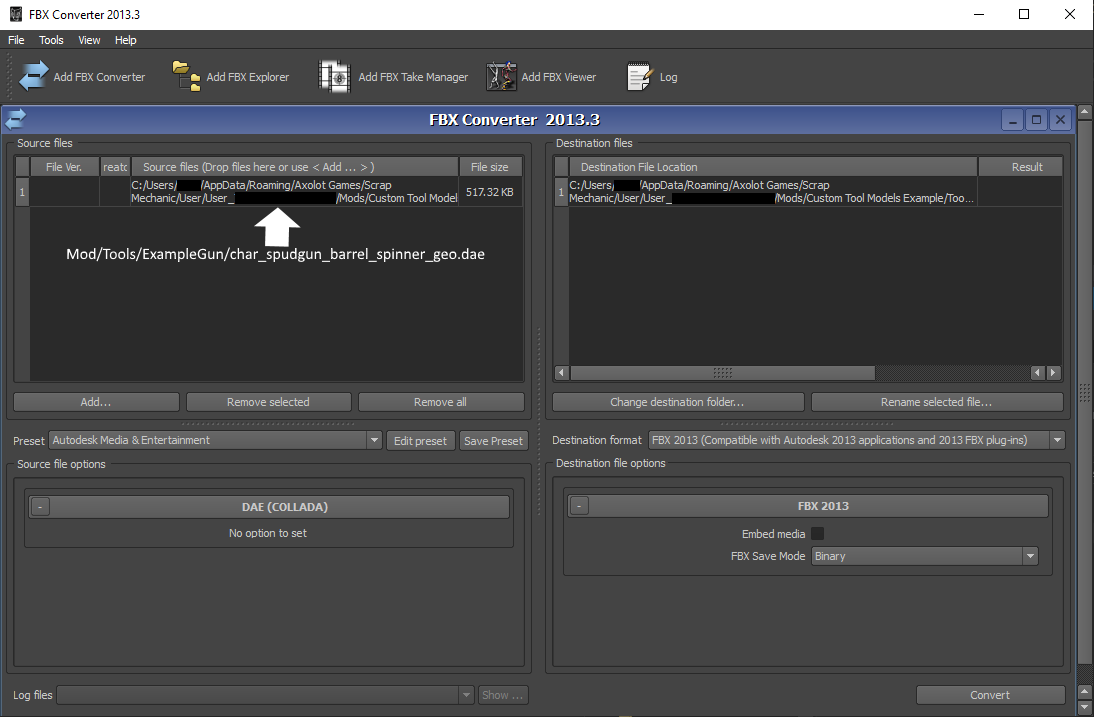
This should generate a char_spudgun_barrel_spinner_geo.fbx file in the same folder.
Loading and editing it in Blender#
First, launch blender and delete the default objects that are there.
Importing the gun barrel#
Then, click on File (at the top left), then Import, then FBX.
Open the Tools/ExampleGun/ folder in Blender and import the generated char_spudgun_barrel_spinner_geo.fbx file.
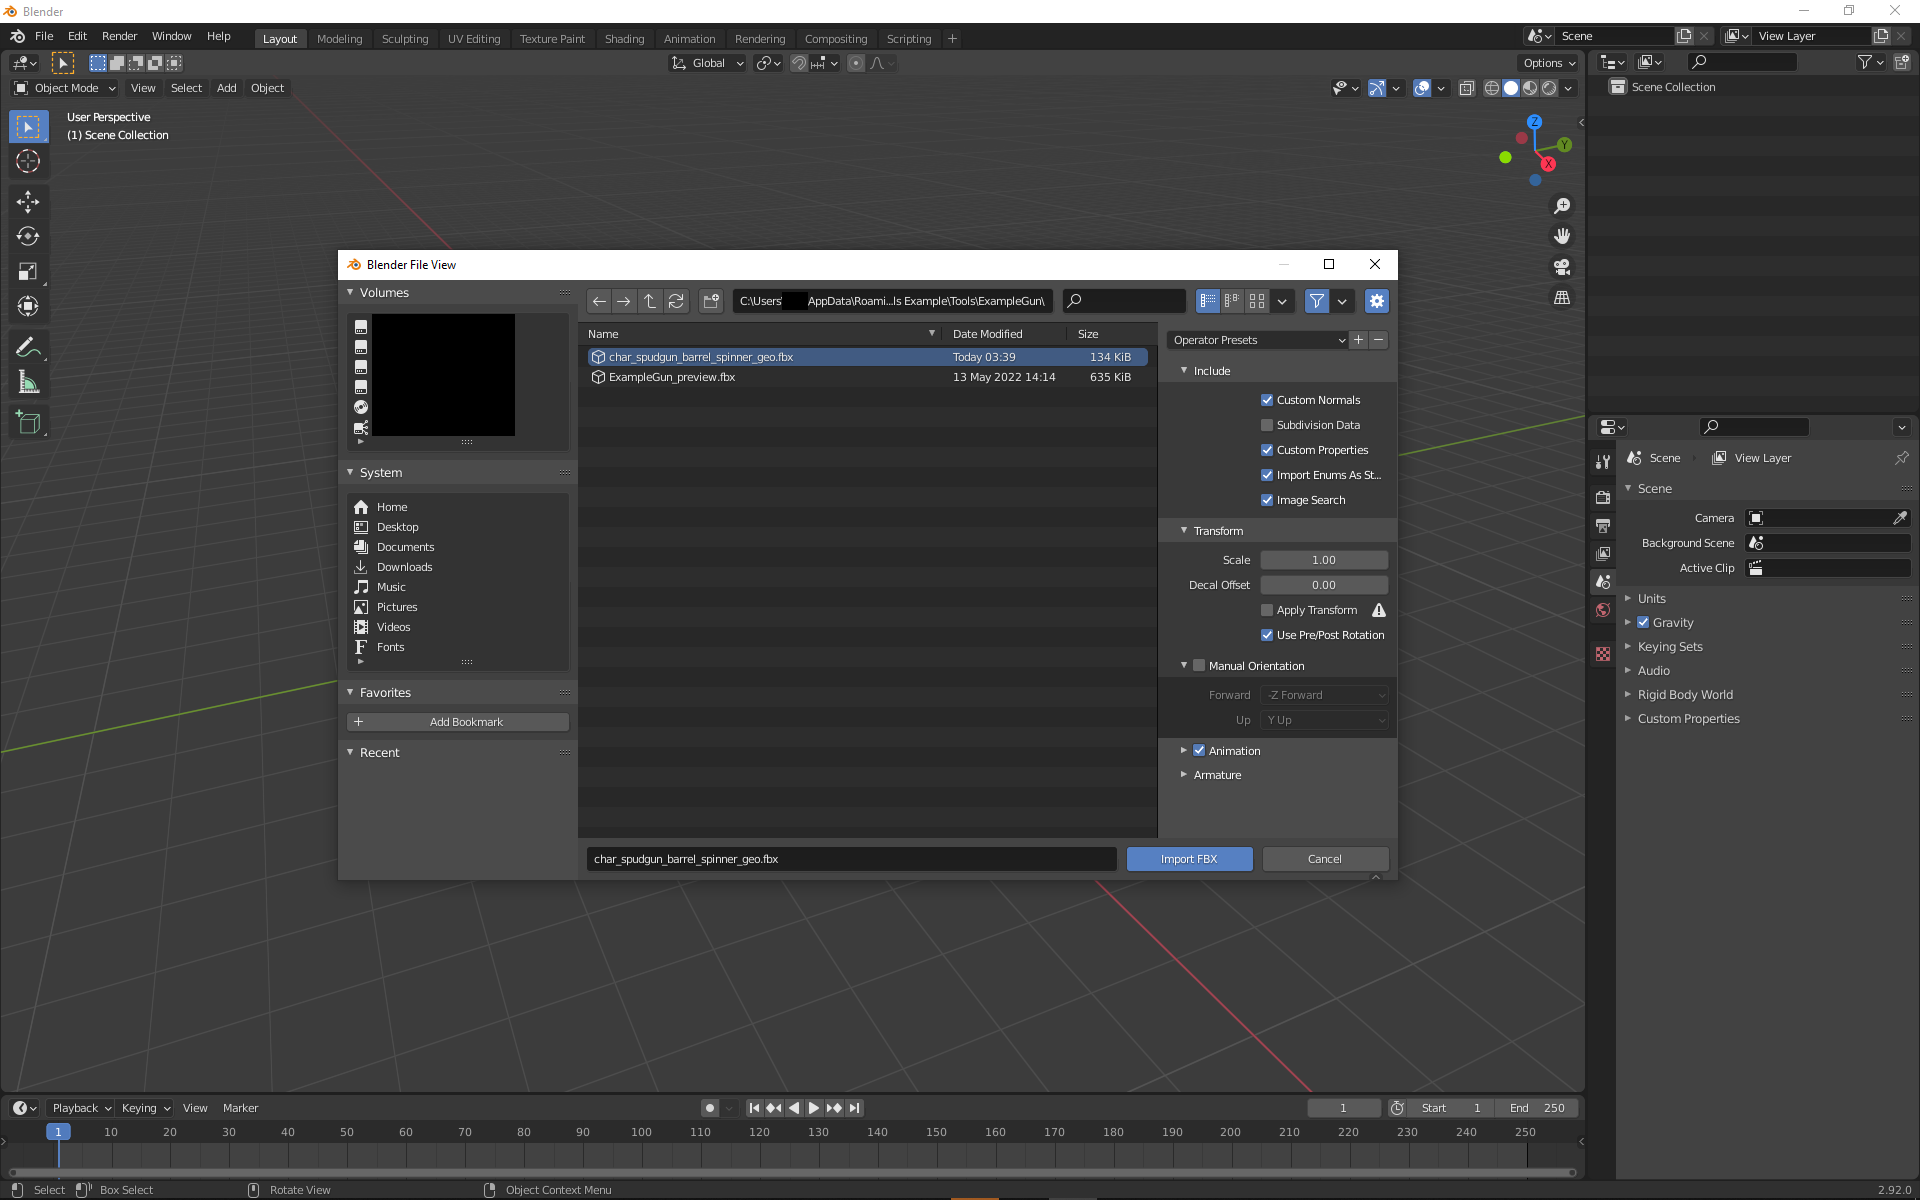
Next, on the right side, expand all objects at the top (this will help later) and,
in the middle, set the Scale for all 3 axis to 1.000.
You might have to zoom out quite a bit after this.
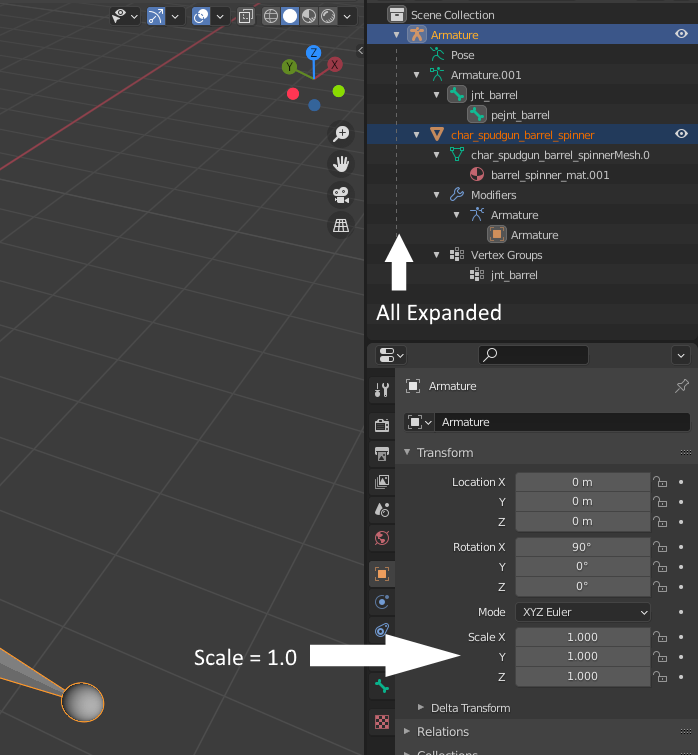
Now we can edit the barrel in any way we want (just be careful not to mess up the bones or armature).
Adding the duck#
In this example, we're going to add a duck statue to the barrel:
First, import the duck's model (Scrap Mechanic/Data/Objects/Mesh/decor/obj_decor_babyduck.fbx)
the same way you imported the gun barrel (File - Import - FBX, select model file, import).
After importing, the list at the top right should look like this:
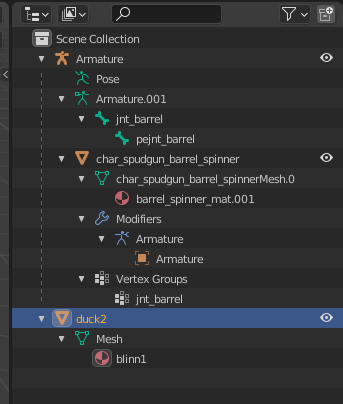
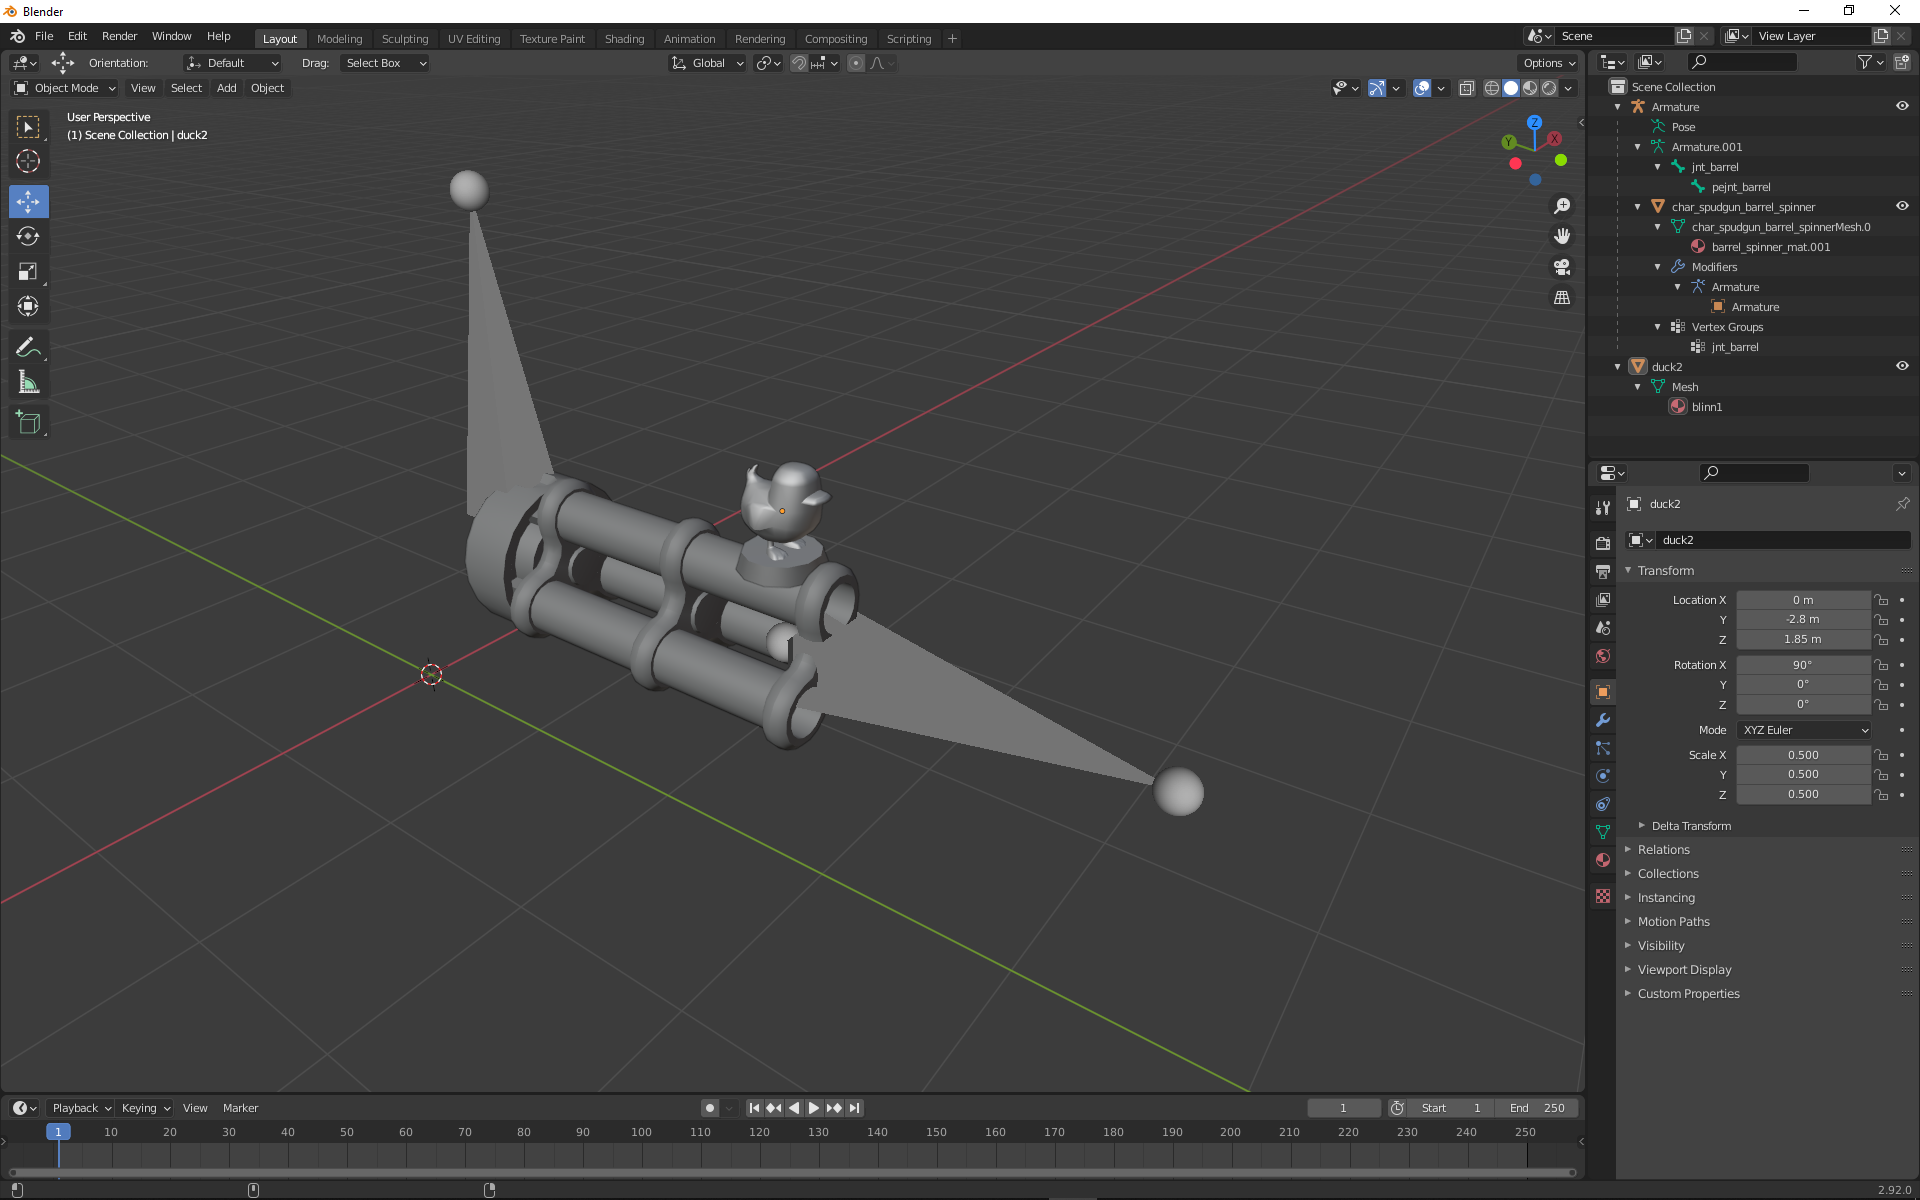
You can now do anything you want with the duck's model, in this example we'll place it on the barrel.
Select the duck in the top right list, then set it's Scale to 0.5 in all 3 axis.
The duck should now become visible at the center:
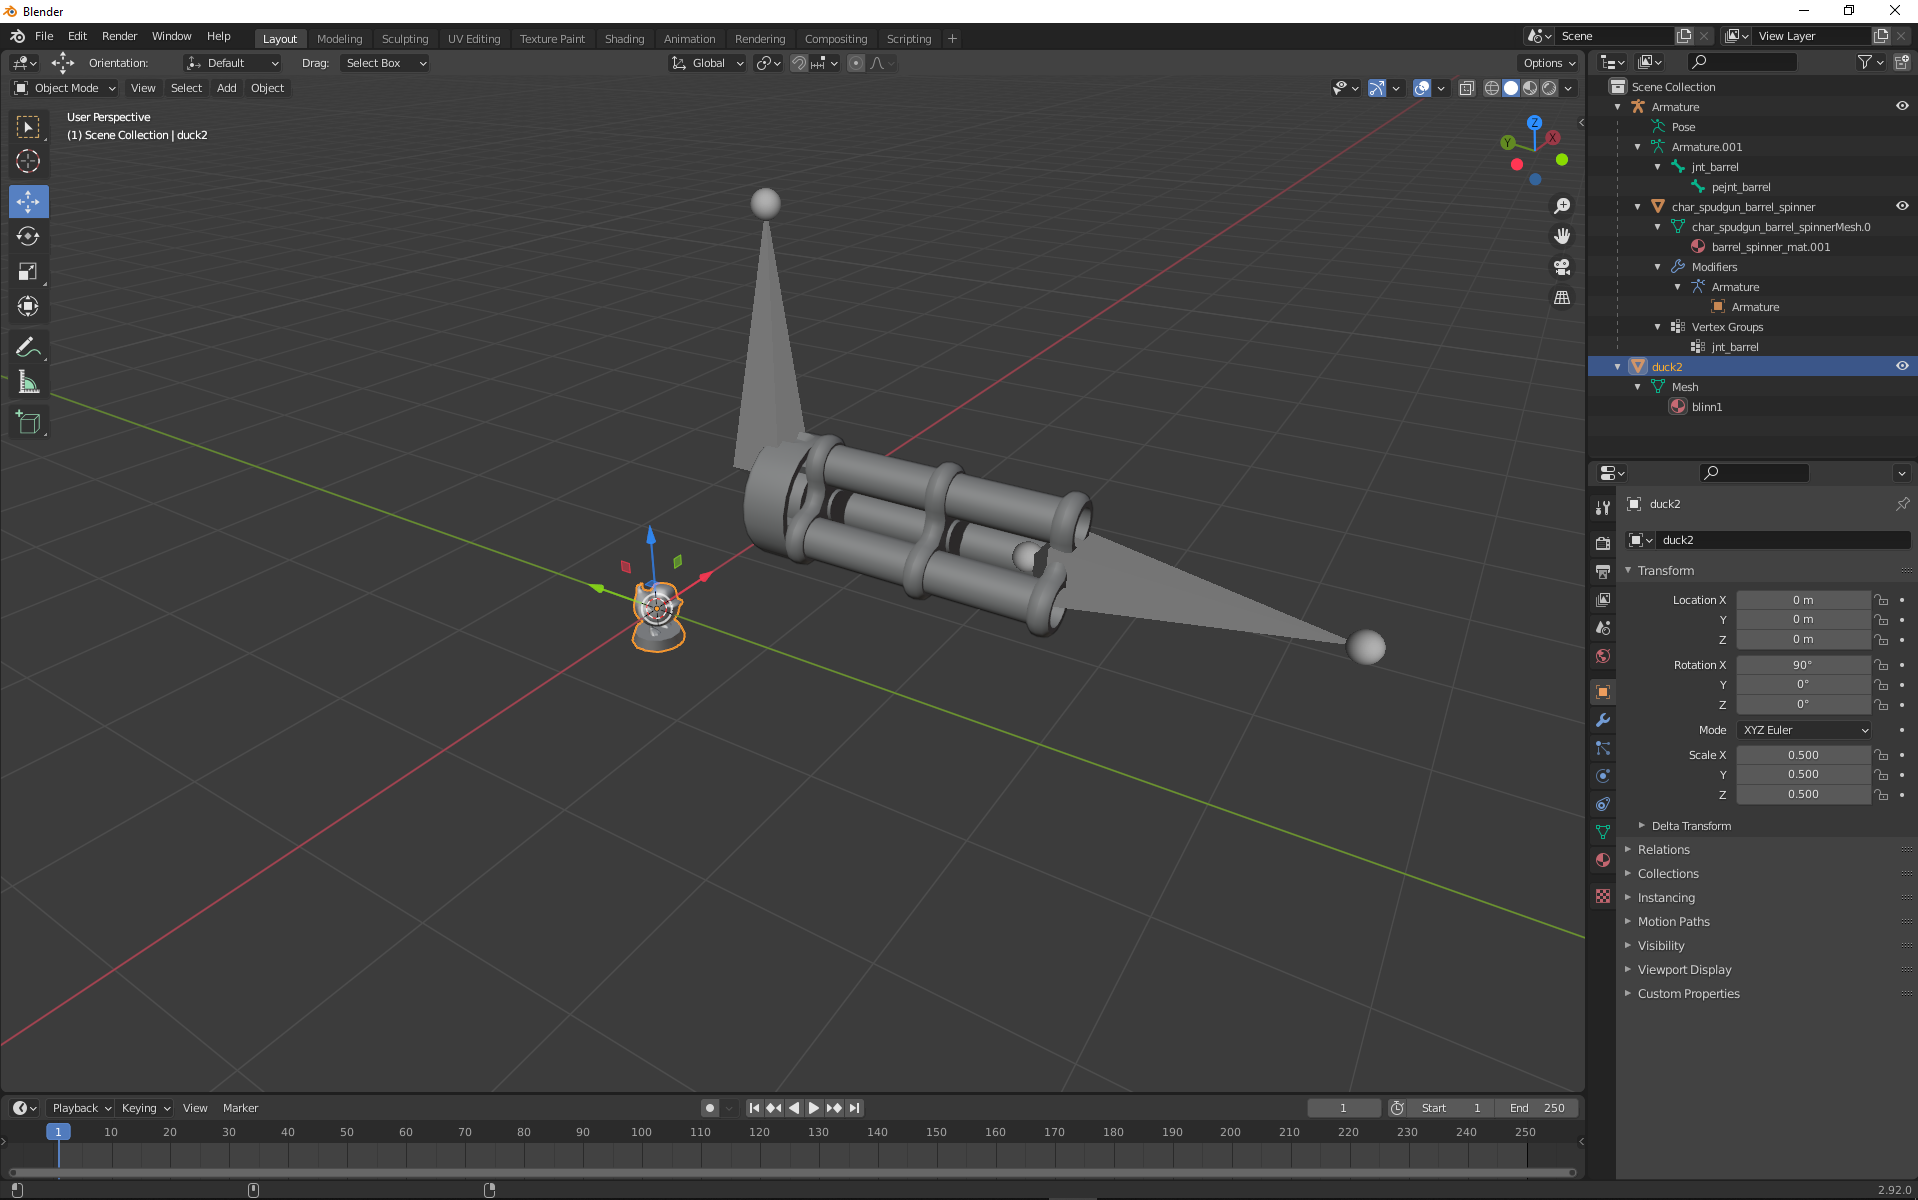
We can now move the duck up and onto the barrel, like this:
The important part#
Now comes the most important part - properly joining the duck to the barrel!
If you do this wrong, the game may crash when loading the mod or the barrel will simply
disappear from the gun while spamming your dev console with hundreds of (useless!) error messages.
Checking the UV Map(s)#
Before we can join anything together, we first have to make sure the UV maps are
named correctly. If they are not named correctly, they will get lost when joining
the models, which will cause the textures to not work.
First, click on the barrel to select it, then open the Object Data Properties on the right.
In there, open the UV Maps tab, double click the active UV map and copy its name.
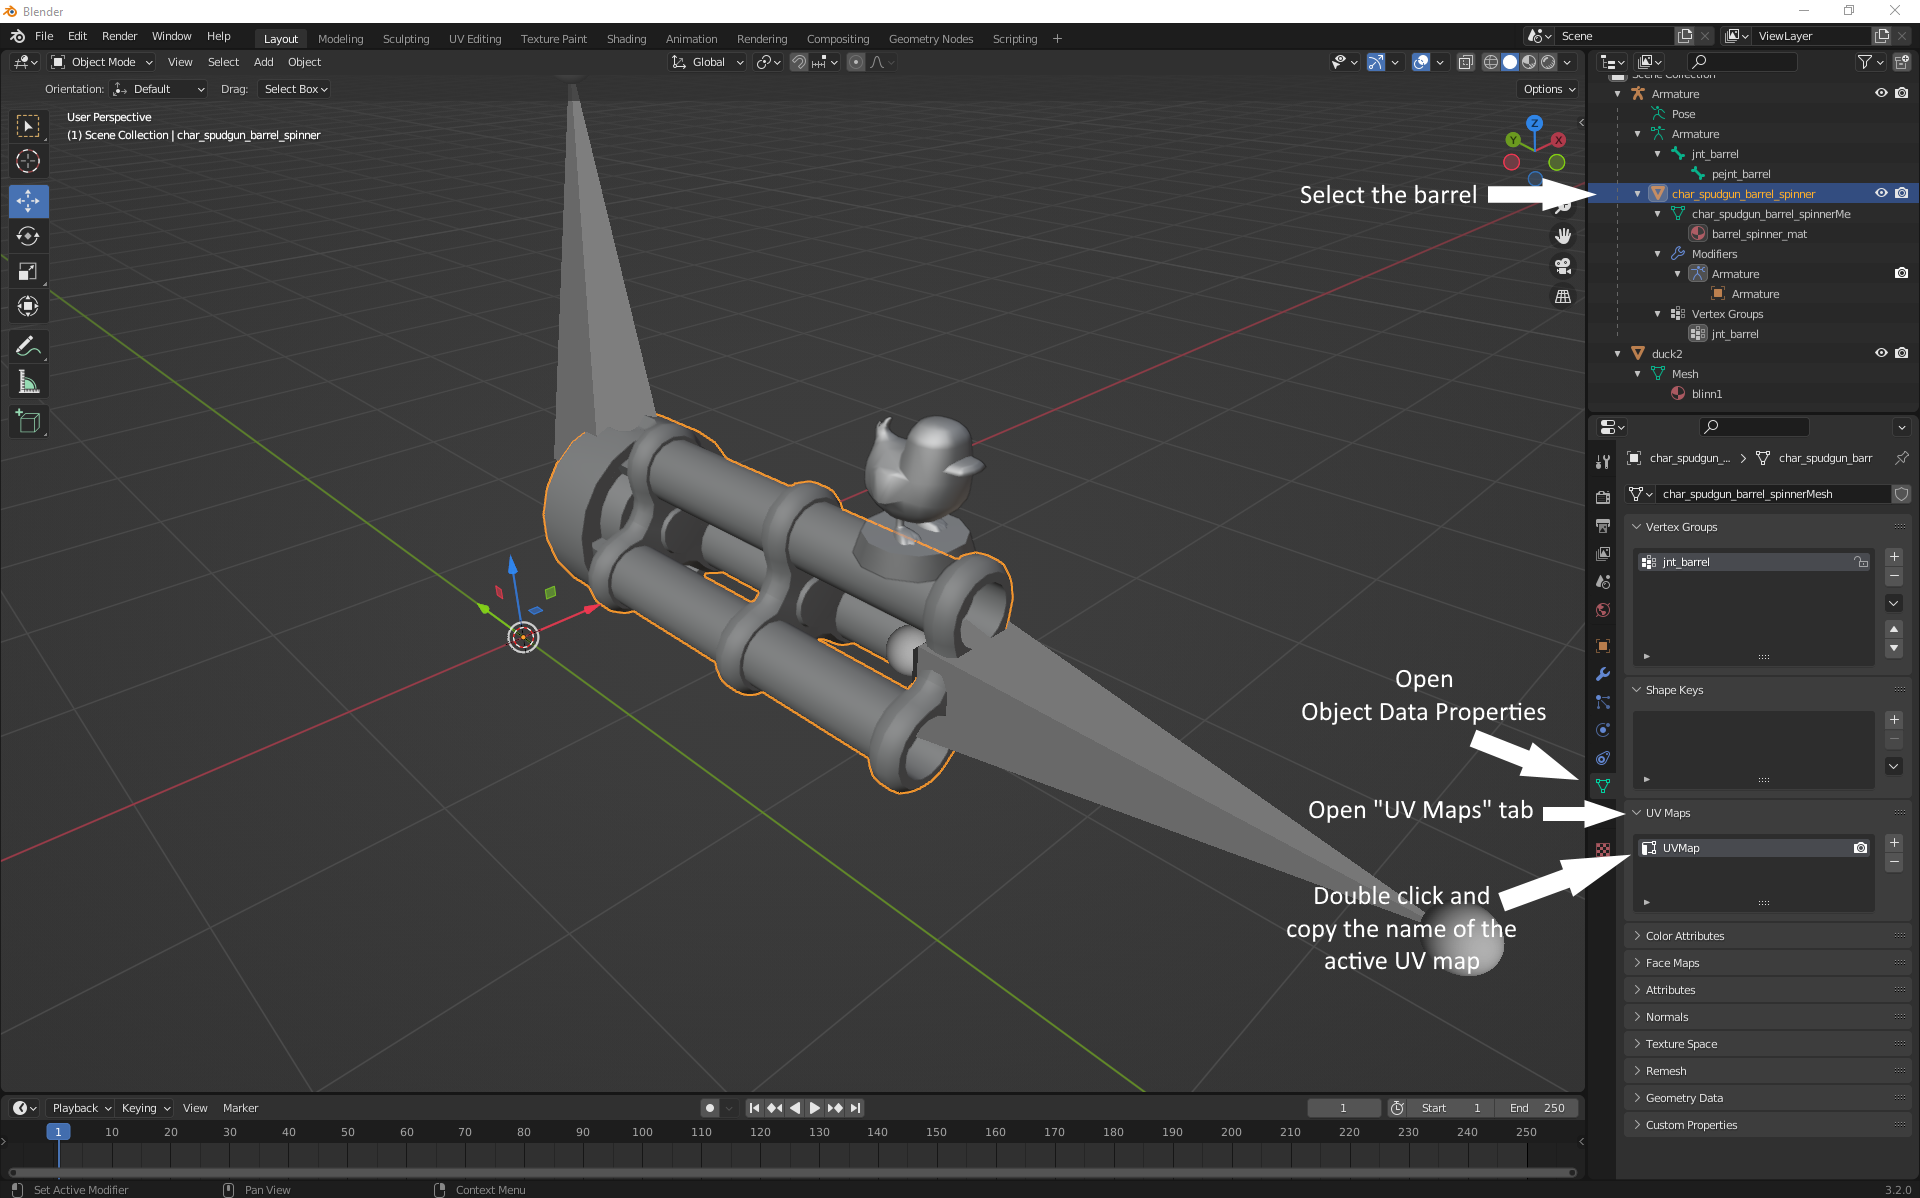
Now we do the same thing with the duck, except instead of copying its UV map name,
we replace the name with the name of the barrel's UV map (which we copied in the previous step).
The UV map of the duck must have the exact same name as the UV map of the barrel!
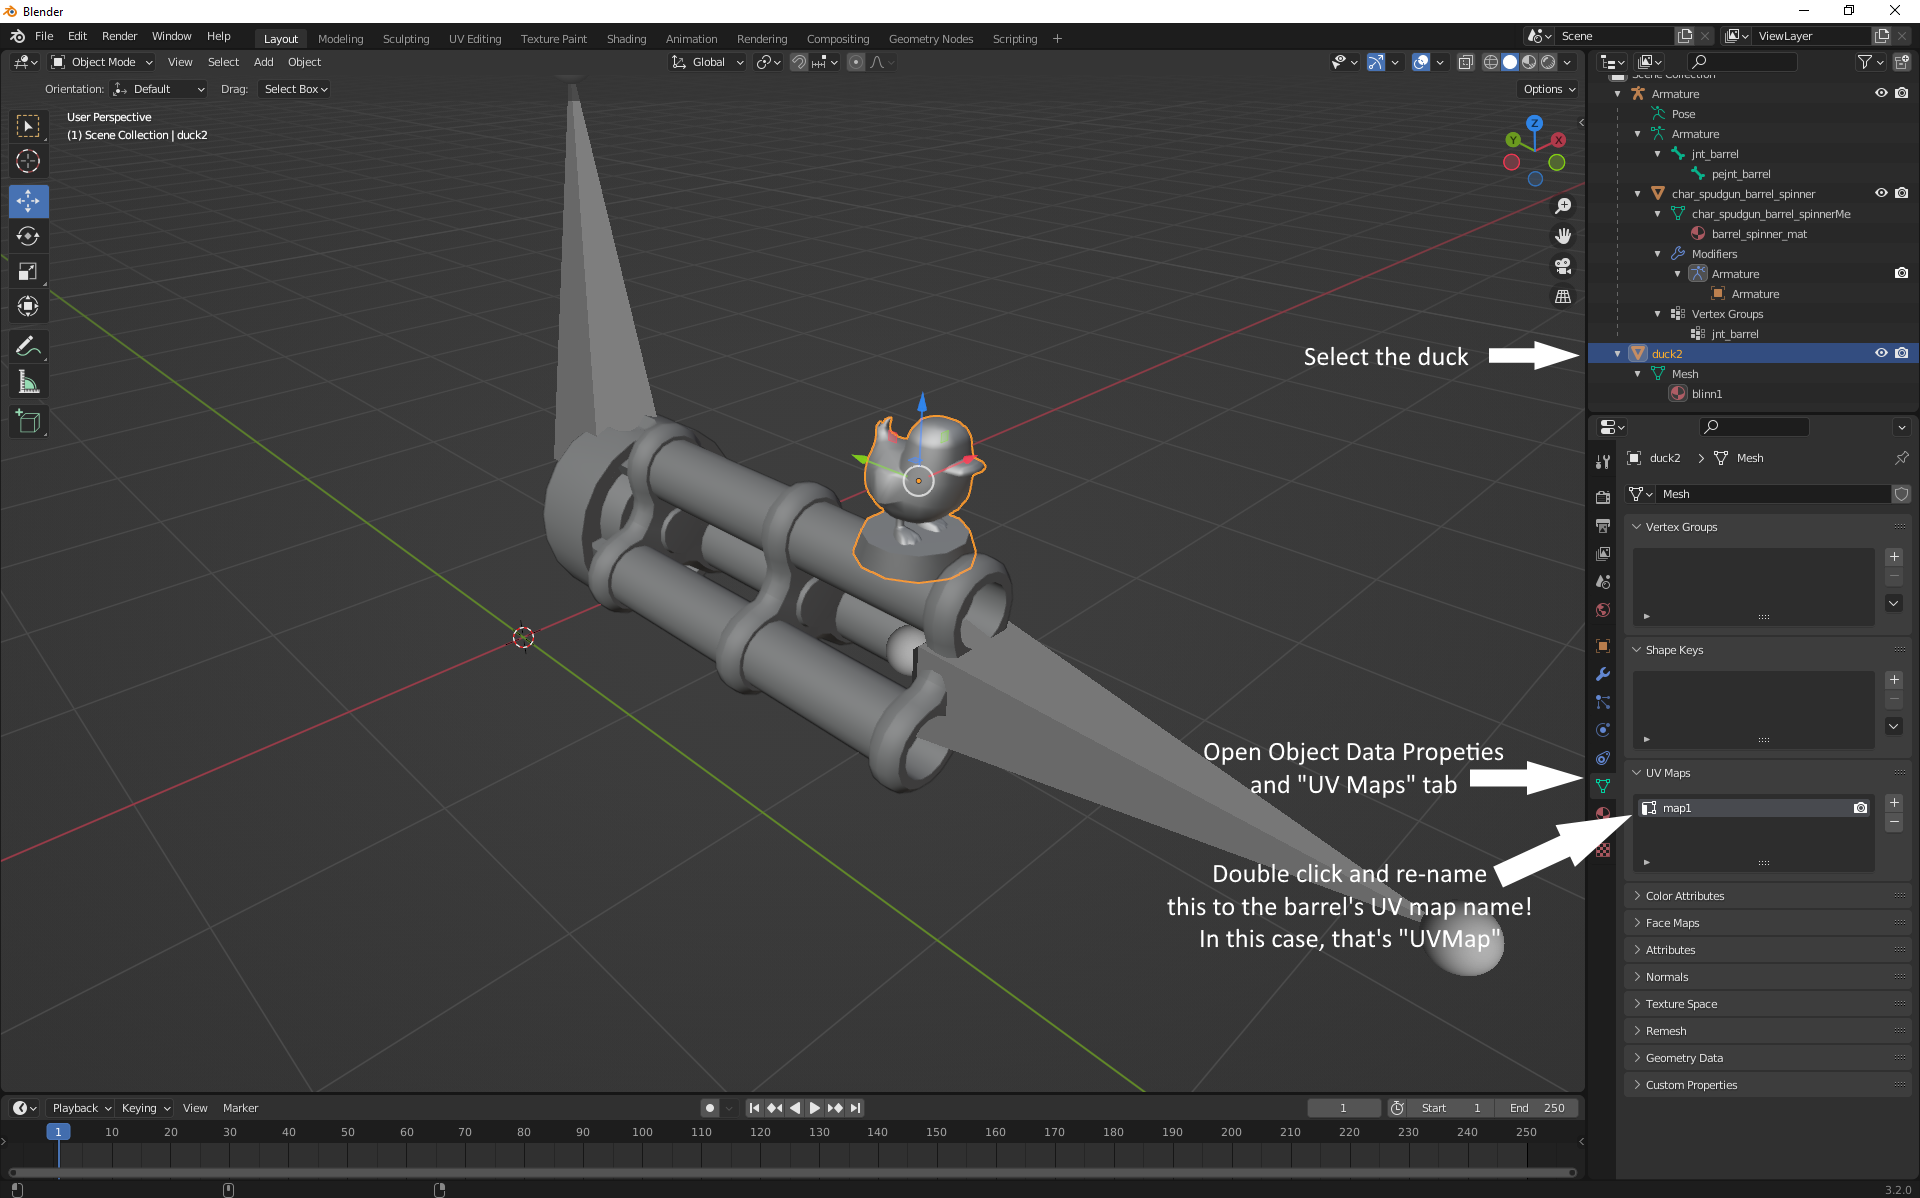
If the UV maps have the same name, we can continue with joining the models together.
Joining the models#
We have to join the duck's model to the barrel's model and assign the duck's vertices
to the barrel's vertex group (jnt_barrel).
First, let's join the duck's model to the barrel's model.
To do so, first make sure blender is in Object Mode (at the top left).
Then, hold Shift and while holding it, first select the duck (left click on it), then the barrel.
warning
The order in which you select the objects is extremely important!
You have to first select your added object(s) (the duck in this case) and select the barrel last!
If you do this wrong, the objects will not join properly and the model won't work in the game.
The duck's model should now have a red outline, while the barrel's outline is orange:
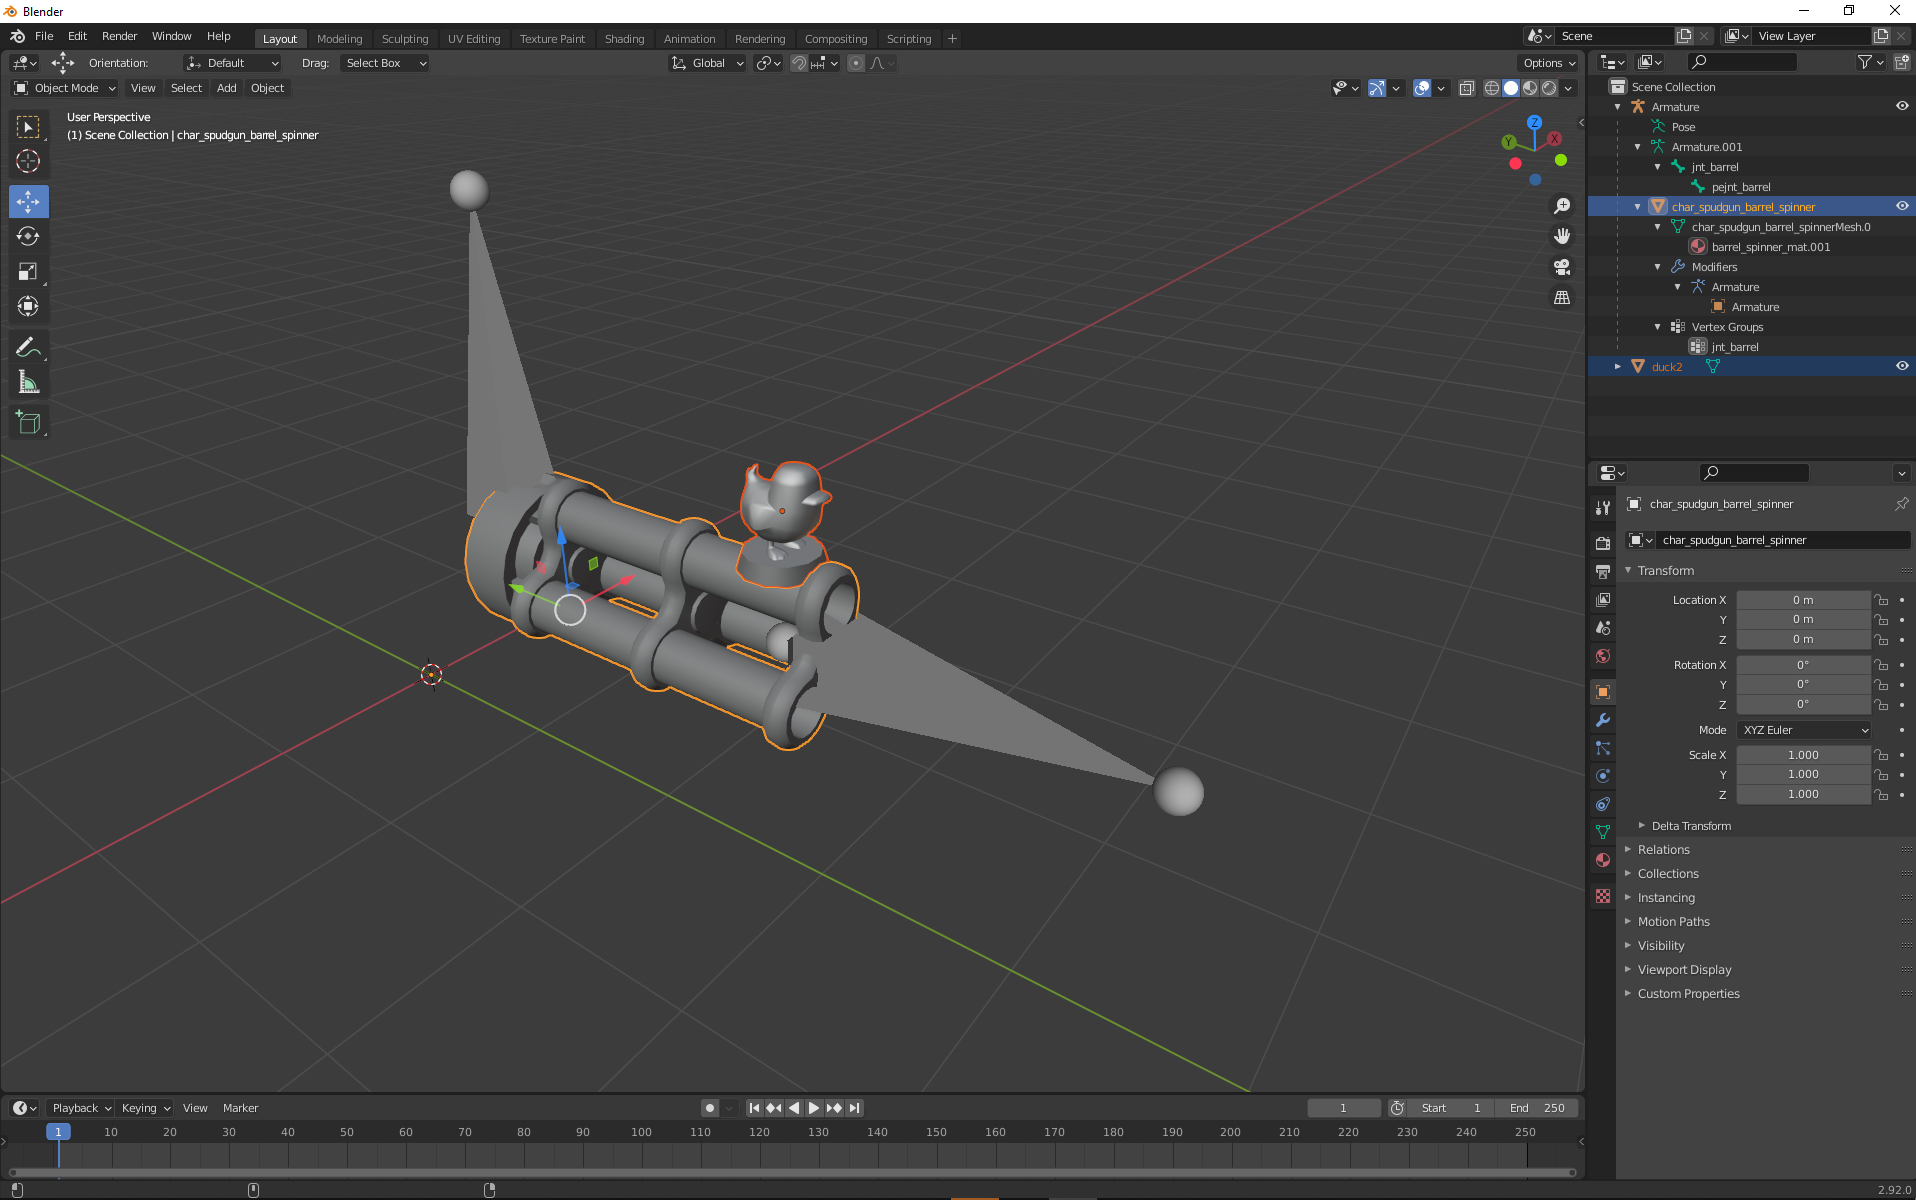
Now, release Shift, right-click and click on Join.
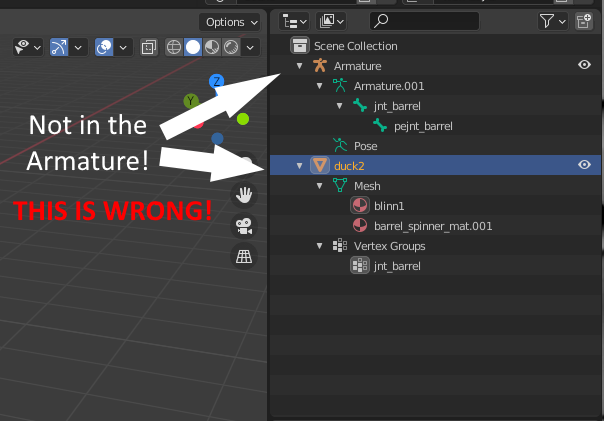
The list at the top right should now update to look like this:
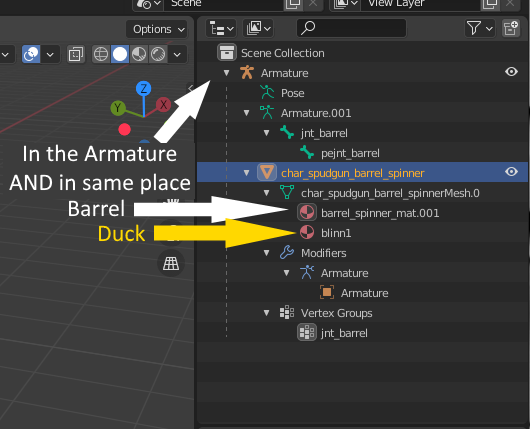
warning
If it looks like this, that is WRONG and will NOT WORK!
You probably joined the models wrong. Un-do with ctrl + z and try again.
Next, we have to assign the duck's vertices to the barrel's vertex group.
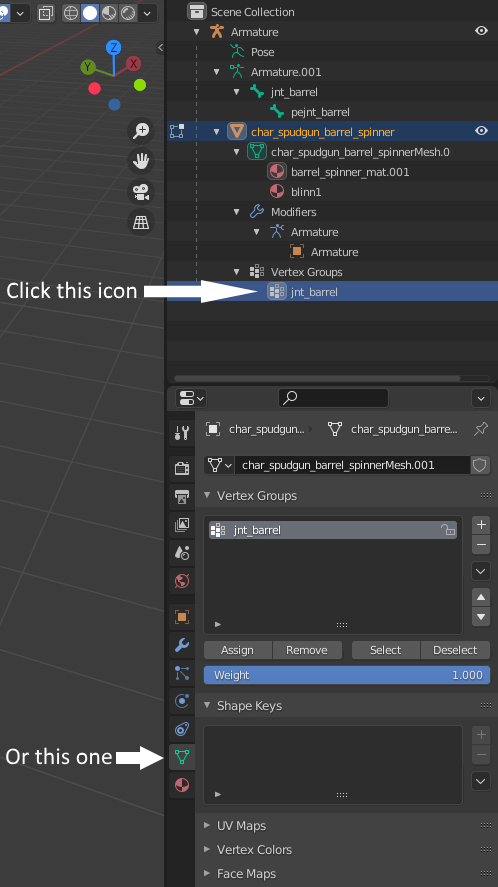
For this, first switch into Edit Mode.
Then, open the vertex group menu by either clicking the icon in the list at the top right
or by clicking the Object Data Properties button below.
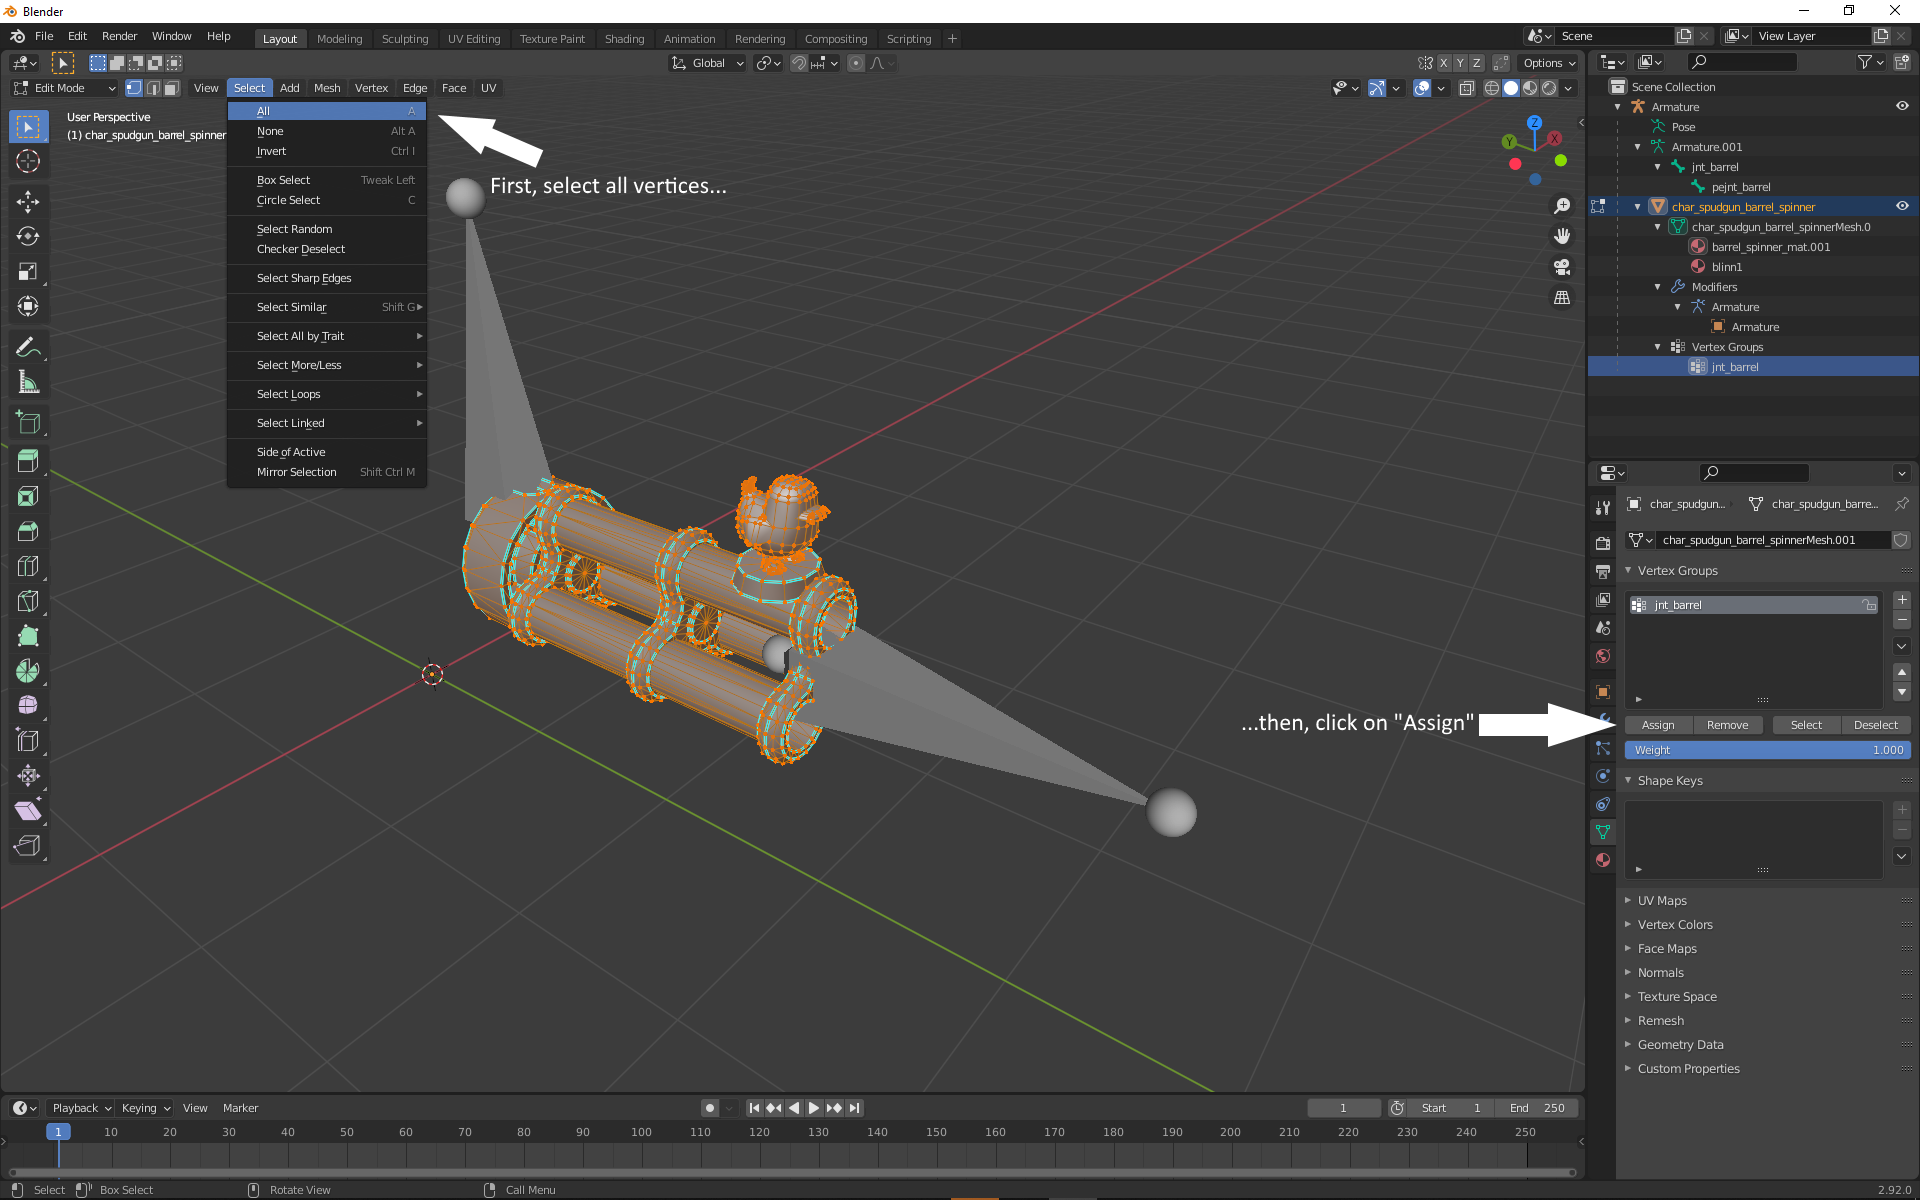
Now, select all vertices by clicking on Select, then All at the top left (or by pressing A).
With all vertices selected, click the Assign button in the vertex group menu.
If you now un-select all vertices (click anywhere) and click the Select button
in the vertex group menu, everything should become selected.
Last but not least, we should check the material names to make sure they all have a proper name.
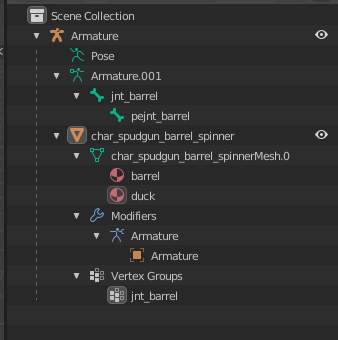
You can do this by simply looking in the list at the top right.
In this case, we have barrel_spinner_mat.001 and blinn1:
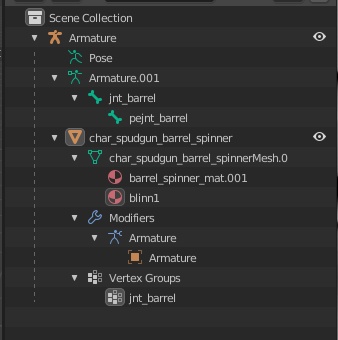
Let's rename those to something a bit better, in this case barrel and duck.
You can rename a material by simply double-clicking on it.
NOTE - You should write these names down somewhere - we need them for the renderables later.
Exporting the model and fixing the DAE#
Now that we've edited the barrel the way we want it to be, we have to export the new model.
At the top right, click on File, then Export, then FBX.
In this window, once again open the Tools/ExampleGun/ folder.
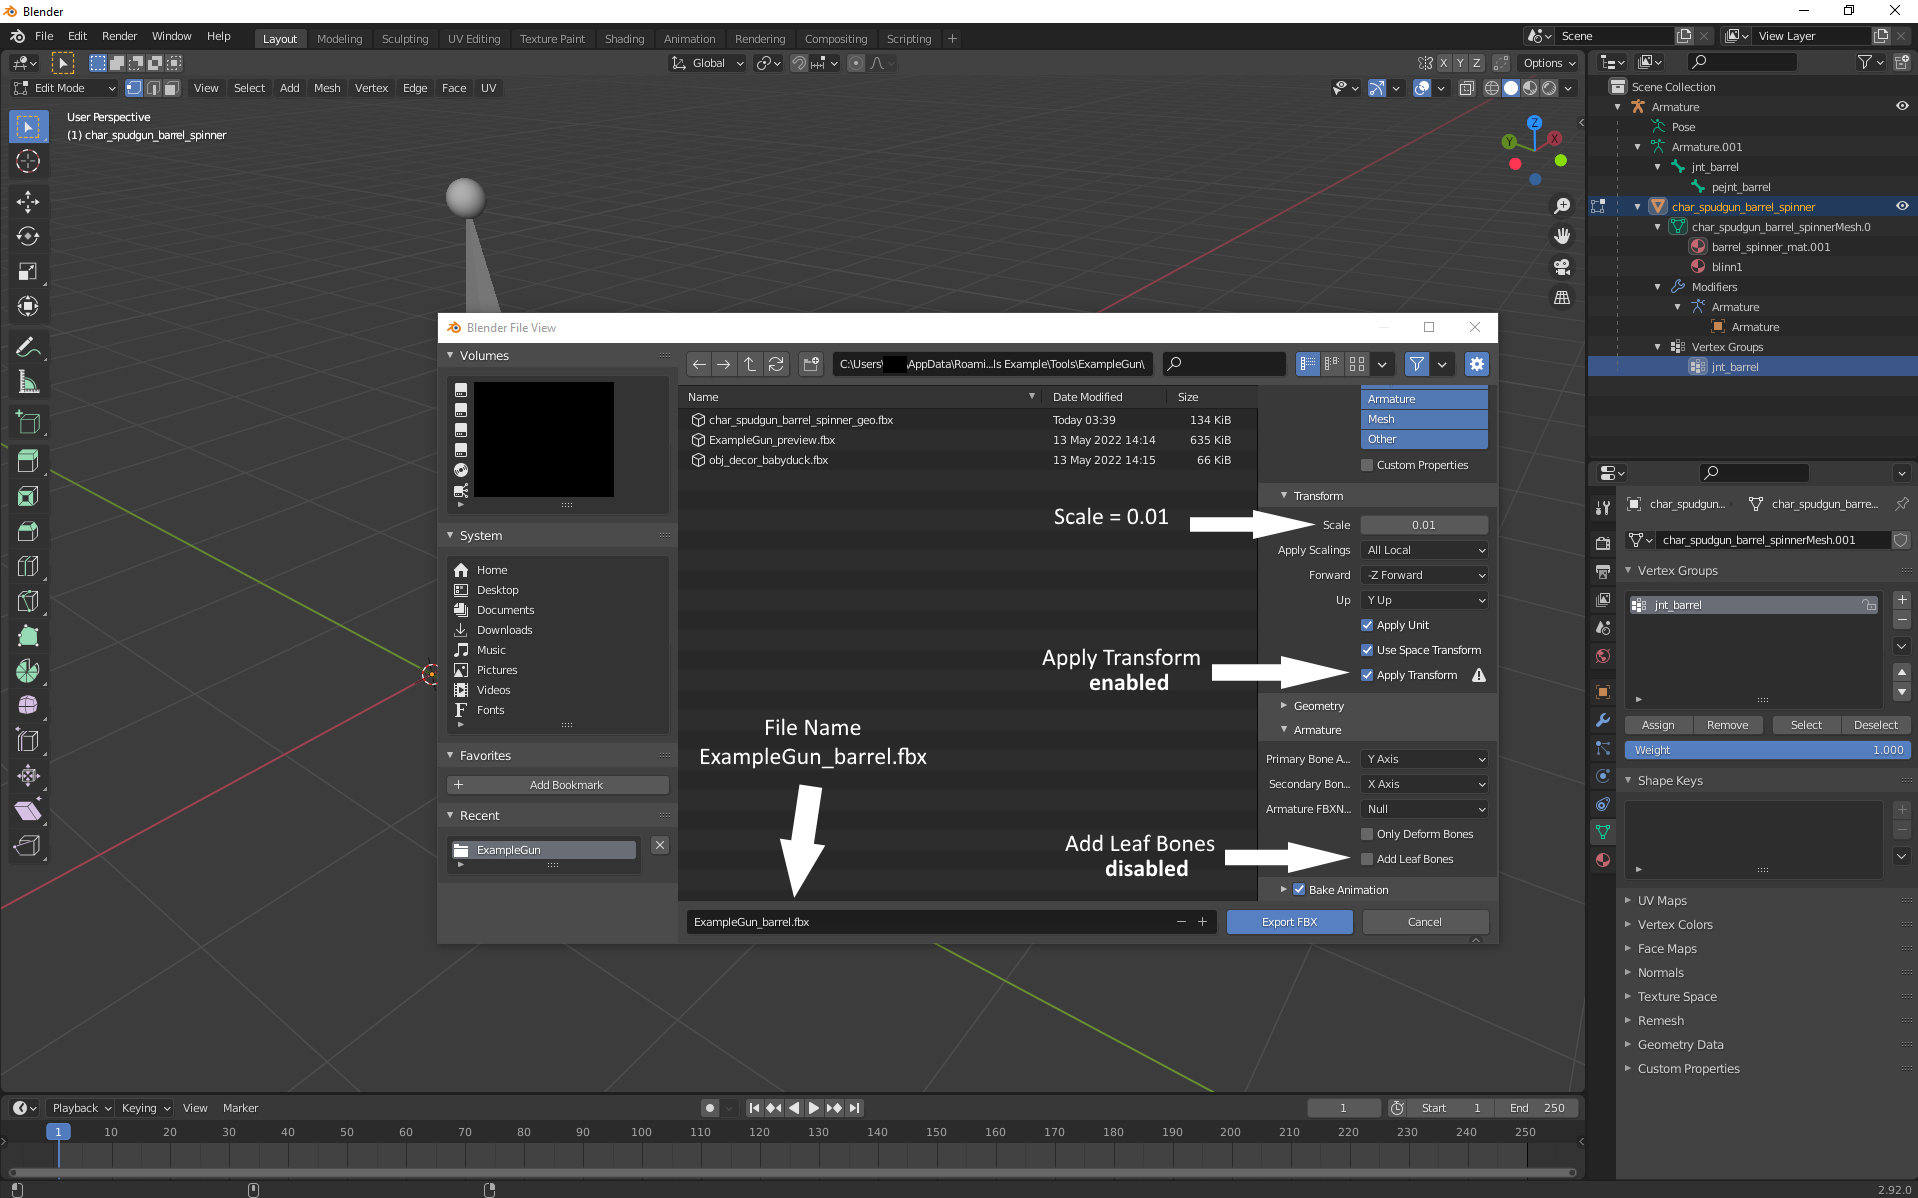
Set the file name to ExampleGun_barrel.fbx.
Now, set the export settings as shown below - In the Transform tab, set Scale to 0.010
and enable Apply Transform. In the Armature tab, make sure that Add Leaf Bones is disabled.
After exporting, we should have an ExampleGun_barrel.fbx file in our Tools/ExampleGun/ folder.
Converting it again#
To load this file in the game, we have to convert it again using FBX Converter.
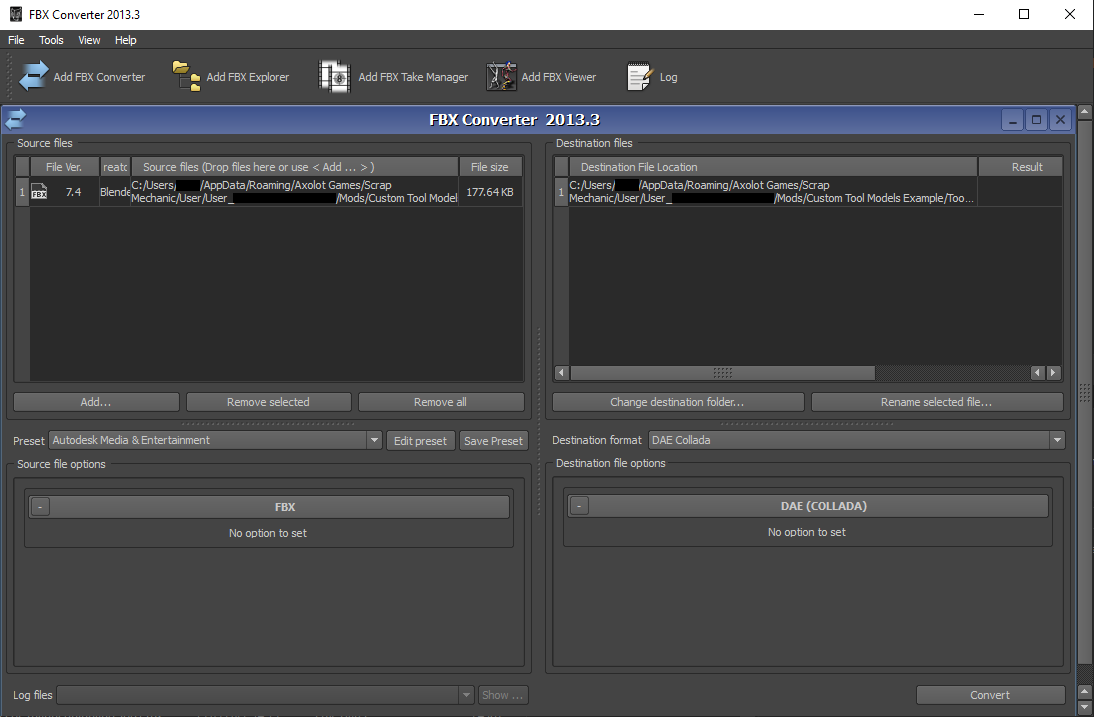
Launch FBX Converter and drag/drop the ExampleGun_barrel.fbx file into the left box.
This time, we need to set the output format to DAE Collada before converting:
After converting, we should have an ExampleGun_barrel.dae file in our Tools/ExampleGun/ folder.
Fixing the DAE#
We now need to slightly edit this file in order to make the game load it properly.
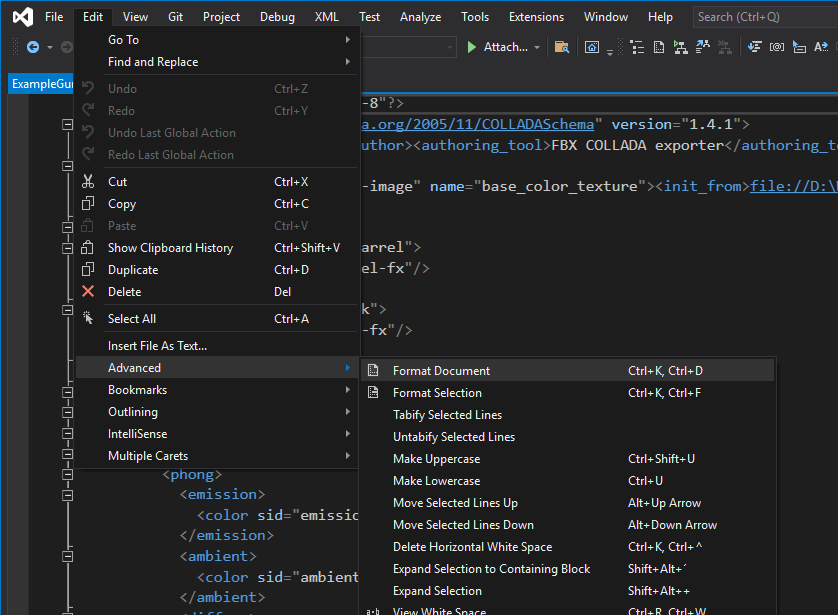
For that, we have to open it in Visual Studio, VS Code or any editor that supports formatting XML files.
In this example, Visual Studio is used.
After opening the file, at the top left, click on Edit, then Advanced, then Format Document.
After formatting the file, scroll all the way down, then slightly up again.
You should eventually see some node tags in the data.
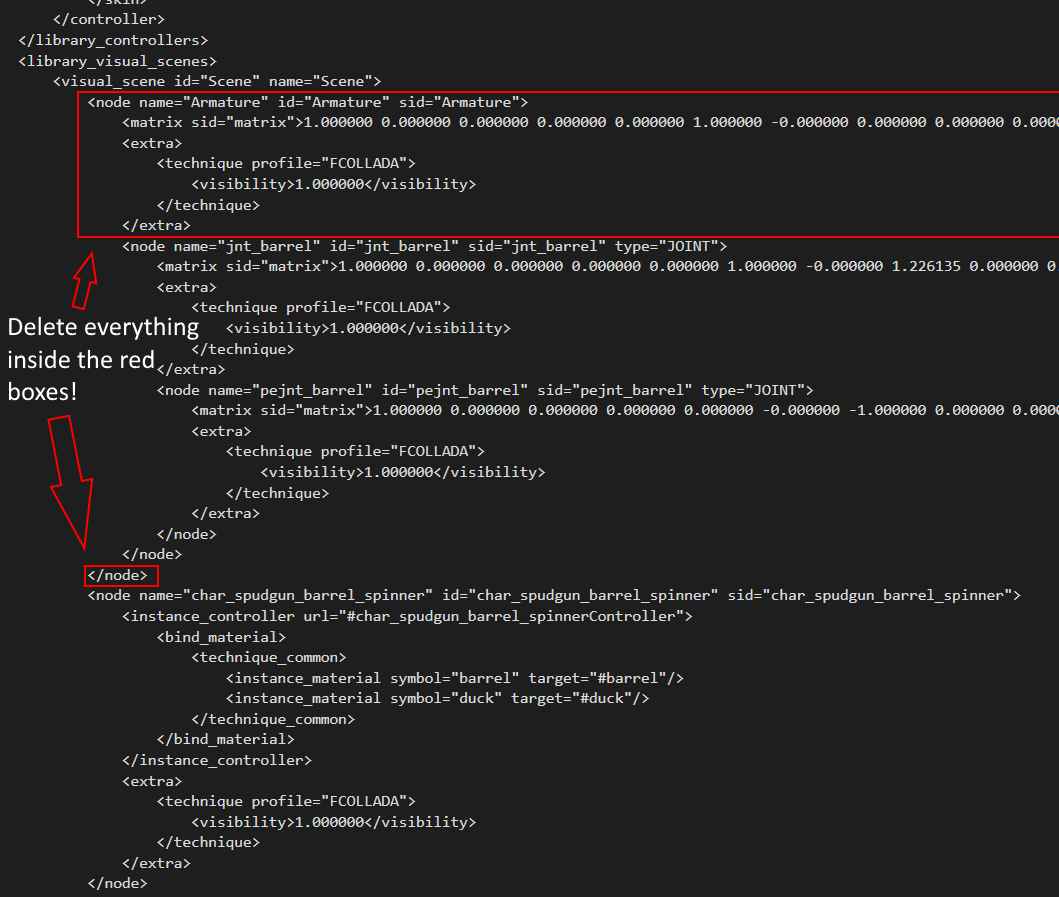
In those nodes, there is one called Armature.
We need to delete this node and its closing tag, else the game will not load the model correctly.
The image below shows what to look for and what you need to delete:
Now, we can save the file and start working on the renderables.
Setting up the renderables#
Open the file: Mod/Tools/ExampleGun/ExampleGun_barrel.rend.
It should look like this:
{  "lodList": [{    "mesh": "$GAME_DATA/Character/Char_Tools/Char_spudgun/Barrel/Barrel_spinner/char_spudgun_barrel_spinner_geo.dae",    "subMeshList" : [      {        "textureList": [          "$GAME_DATA/Character/Char_Tools/Char_spudgun/Barrel/Barrel_spinner/char_spudgun_barrel_spinner_dif.tga",          "$GAME_DATA/Character/Char_Tools/Char_spudgun/Barrel/Barrel_spinner/char_spudgun_barrel_spinner_asg.tga",          "$GAME_DATA/Character/Char_Tools/Char_spudgun/Barrel/Barrel_spinner/char_spudgun_barrel_spinner_nor.tga"        ],        "color": "ffffff",        "material": "DifAsgNor"      }    ],    "animationList": [      { "name" : "spudgun_spinner_shoot_fp", "file" : "$GAME_DATA/Character/Char_Tools/Char_spudgun/Barrel/Barrel_spinner/ani_char_spudgun_barrel_spinner_rotation.dae", "looping" : true },      { "name" : "spudgun_spinner_shoot_tp", "file" : "$GAME_DATA/Character/Char_Tools/Char_spudgun/Barrel/Barrel_spinner/ani_char_spudgun_barrel_spinner_rotation.dae", "looping" : true }    ],
"maxViewDistance": 1000.0 }]}We change the mesh entry to point to our modified model file and change
the subMeshList into a subMeshMap.
Then, we add a subMesh entry for each object in the model - The gun barrel and the duck statue.
We have to give each subMesh entry the same name that we gave each object in blender.
In this example, those are barrel and duck:
{  "lodList": [{    "mesh": "$CONTENT_DATA/Tools/ExampleGun/ExampleGun_barrel.dae",    "subMeshMap": {      "barrel": {        "textureList": [          "$GAME_DATA/Character/Char_Tools/Char_spudgun/Barrel/Barrel_spinner/char_spudgun_barrel_spinner_dif.tga",          "$GAME_DATA/Character/Char_Tools/Char_spudgun/Barrel/Barrel_spinner/char_spudgun_barrel_spinner_asg.tga",          "$GAME_DATA/Character/Char_Tools/Char_spudgun/Barrel/Barrel_spinner/char_spudgun_barrel_spinner_nor.tga"        ],        "color": "ffffff",        "material": "DifAsgNor"      },      "duck": {        "textureList": [          "$GAME_DATA/Objects/Textures/decor/obj_decor_babyduck_dif.tga",          "$GAME_DATA/Objects/Textures/decor/obj_decor_babyduck_asg.tga",          "$GAME_DATA/Objects/Textures/decor/obj_decor_babyduck_nor.tga"        ],        "material": "DifAsgNor"      }    },    "animationList": [      { "name" : "spudgun_spinner_shoot_fp", "file" : "$GAME_DATA/Character/Char_Tools/Char_spudgun/Barrel/Barrel_spinner/ani_char_spudgun_barrel_spinner_rotation.dae", "looping" : true },      { "name" : "spudgun_spinner_shoot_tp", "file" : "$GAME_DATA/Character/Char_Tools/Char_spudgun/Barrel/Barrel_spinner/ani_char_spudgun_barrel_spinner_rotation.dae", "looping" : true }    ],
"maxViewDistance": 1000.0 }]}Then, save the file.
You can now launch the game and load a world with the mod enabled.
If you did everything right, there should be a new tool with no icon in your inventory.
Equip it and you should have a gatling gun with a duck on the end of the barrel!
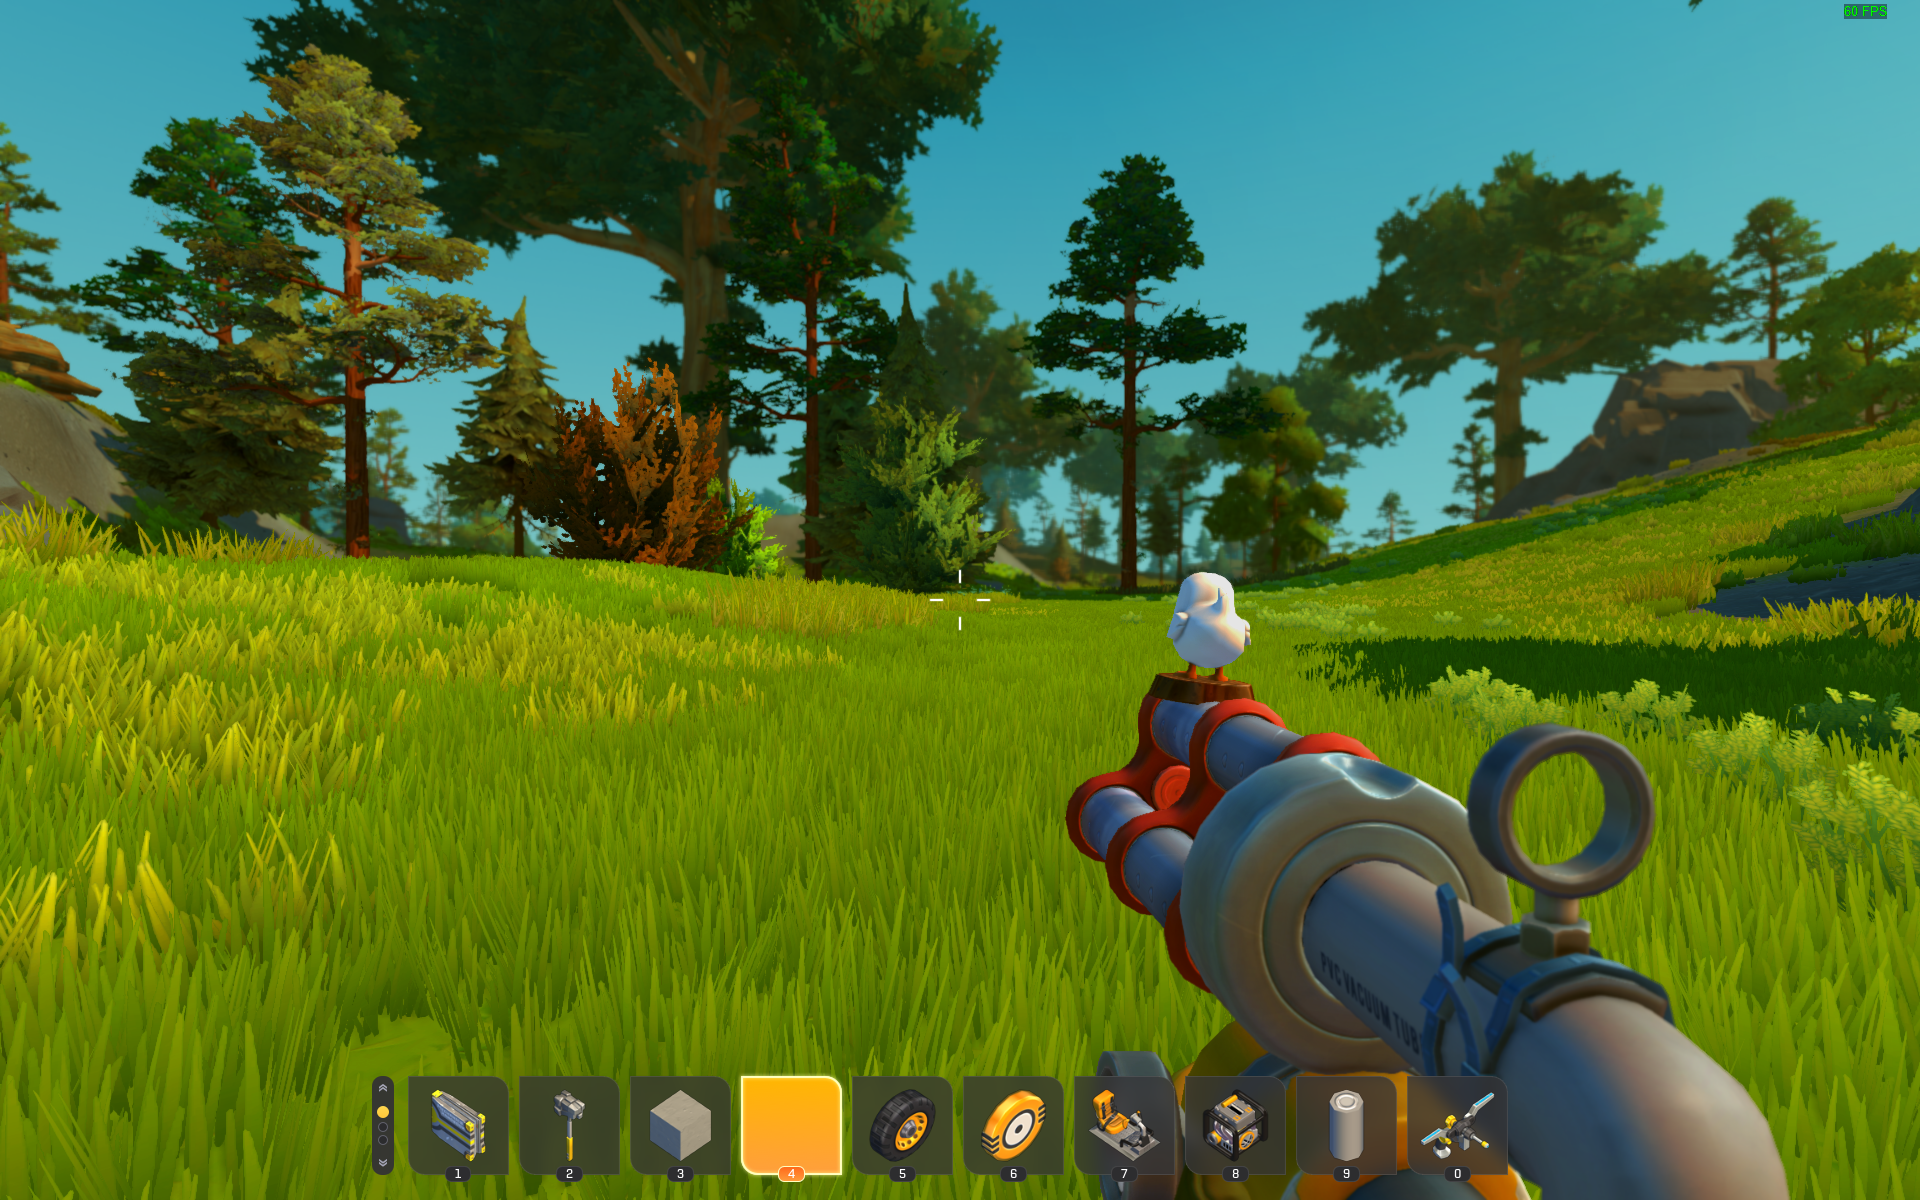
Note that, in the game, the duck will be white instead of yellow.
This is expected and has nothing to do with the model.
It can be changed by simply editing the texture file for the duck.
Creating a preview model and renderable#
Now that our custom gun is in the game, we should also create a preview model and renderable
so that the preview in the inventory shows the actual gun with the duck on it.
Creating the preview model#
To create the preview model, we can simply modify the existing gatling gun preview that we copied at the beginning.
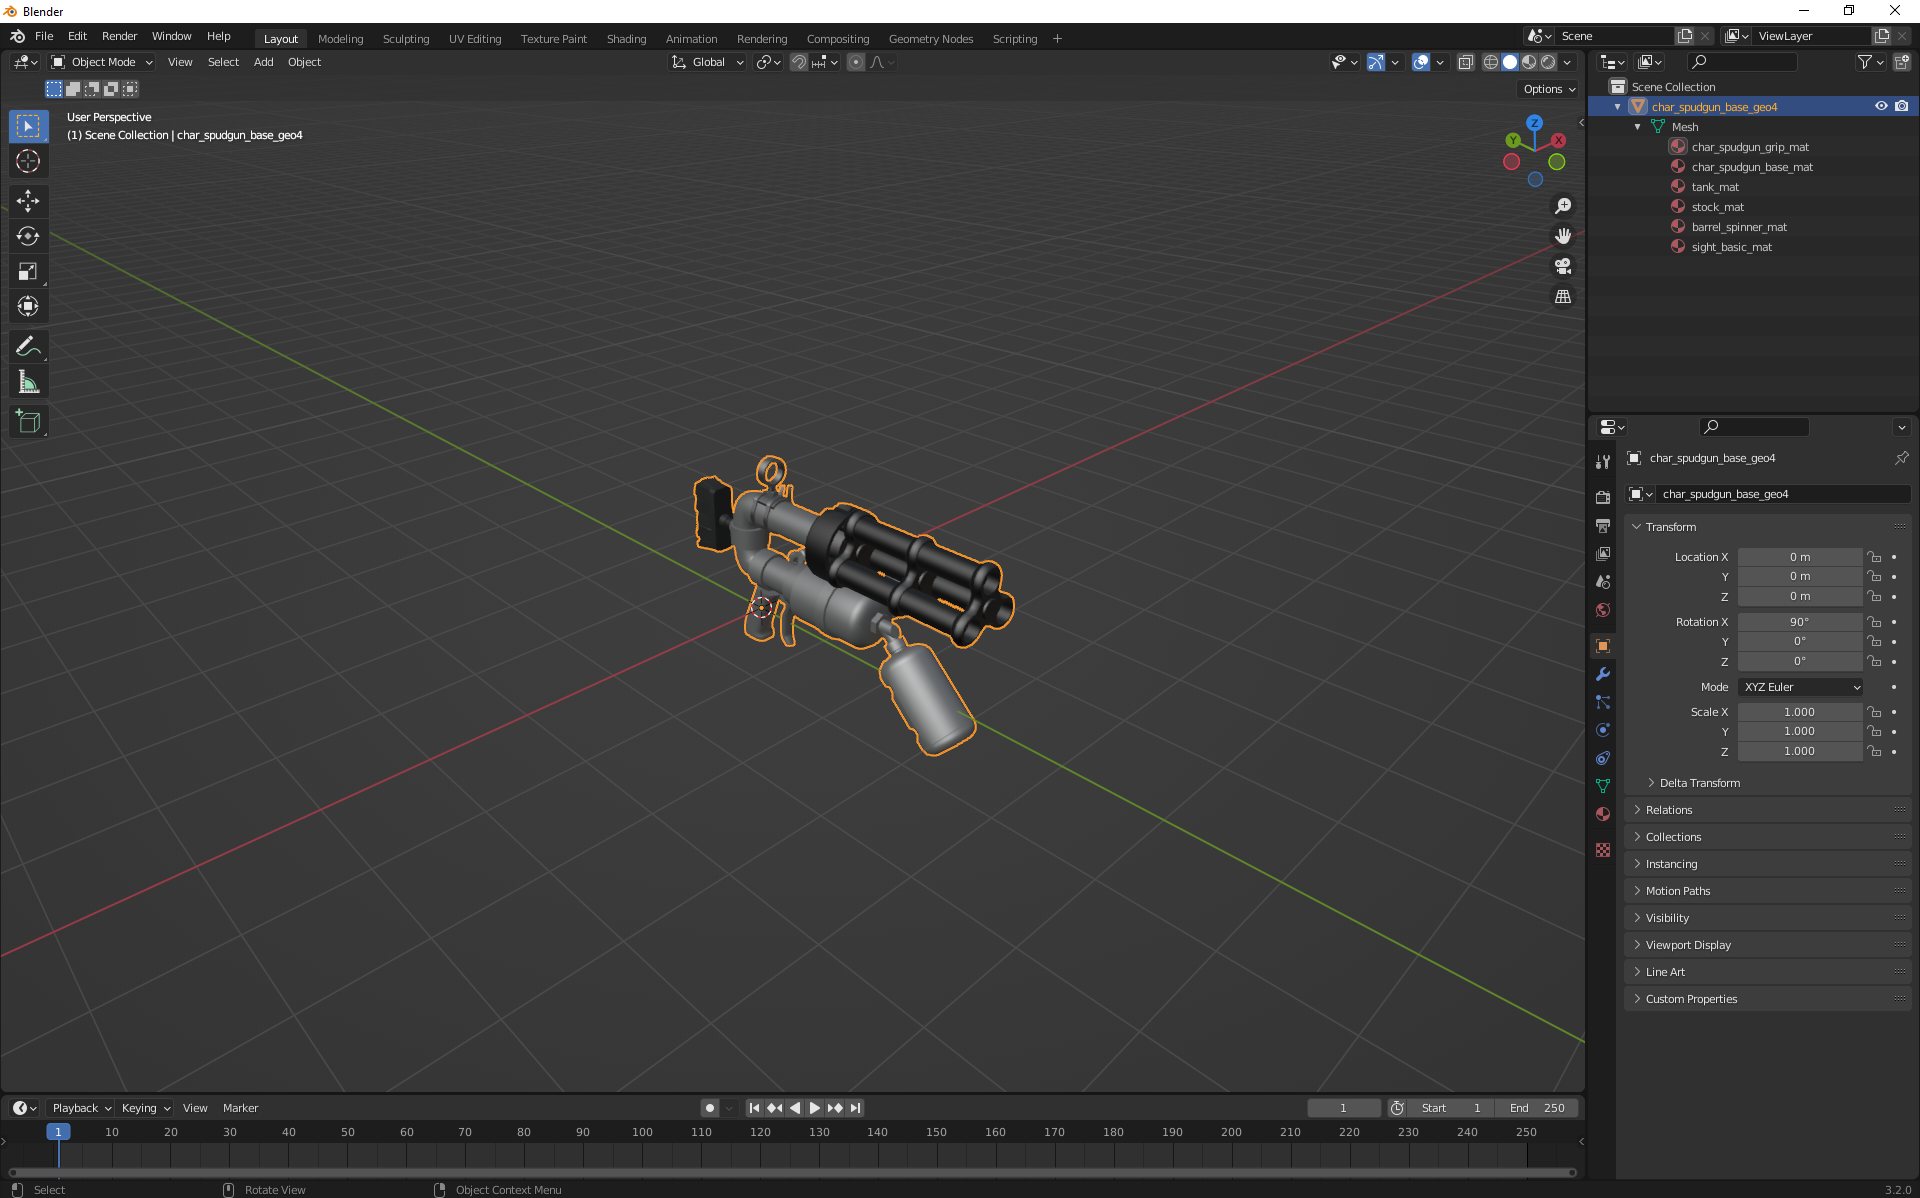
First, launch Blender and import the Mod/Tools/ExampleGun/ExampleGun_preview.fbx file
in the same way as the model before (File, Import, FBX, select the file, import, set scale to 1.000).
It should look like this:
We now have 2 ways of editing this model:
- Delete the barrel and copy the modified one from the gun model OR
- Make the same changes to this model as we did to the gun's model
In this case, we'll go with the second option, as we made very little changes to the model
which won't take long to apply to this model as well.
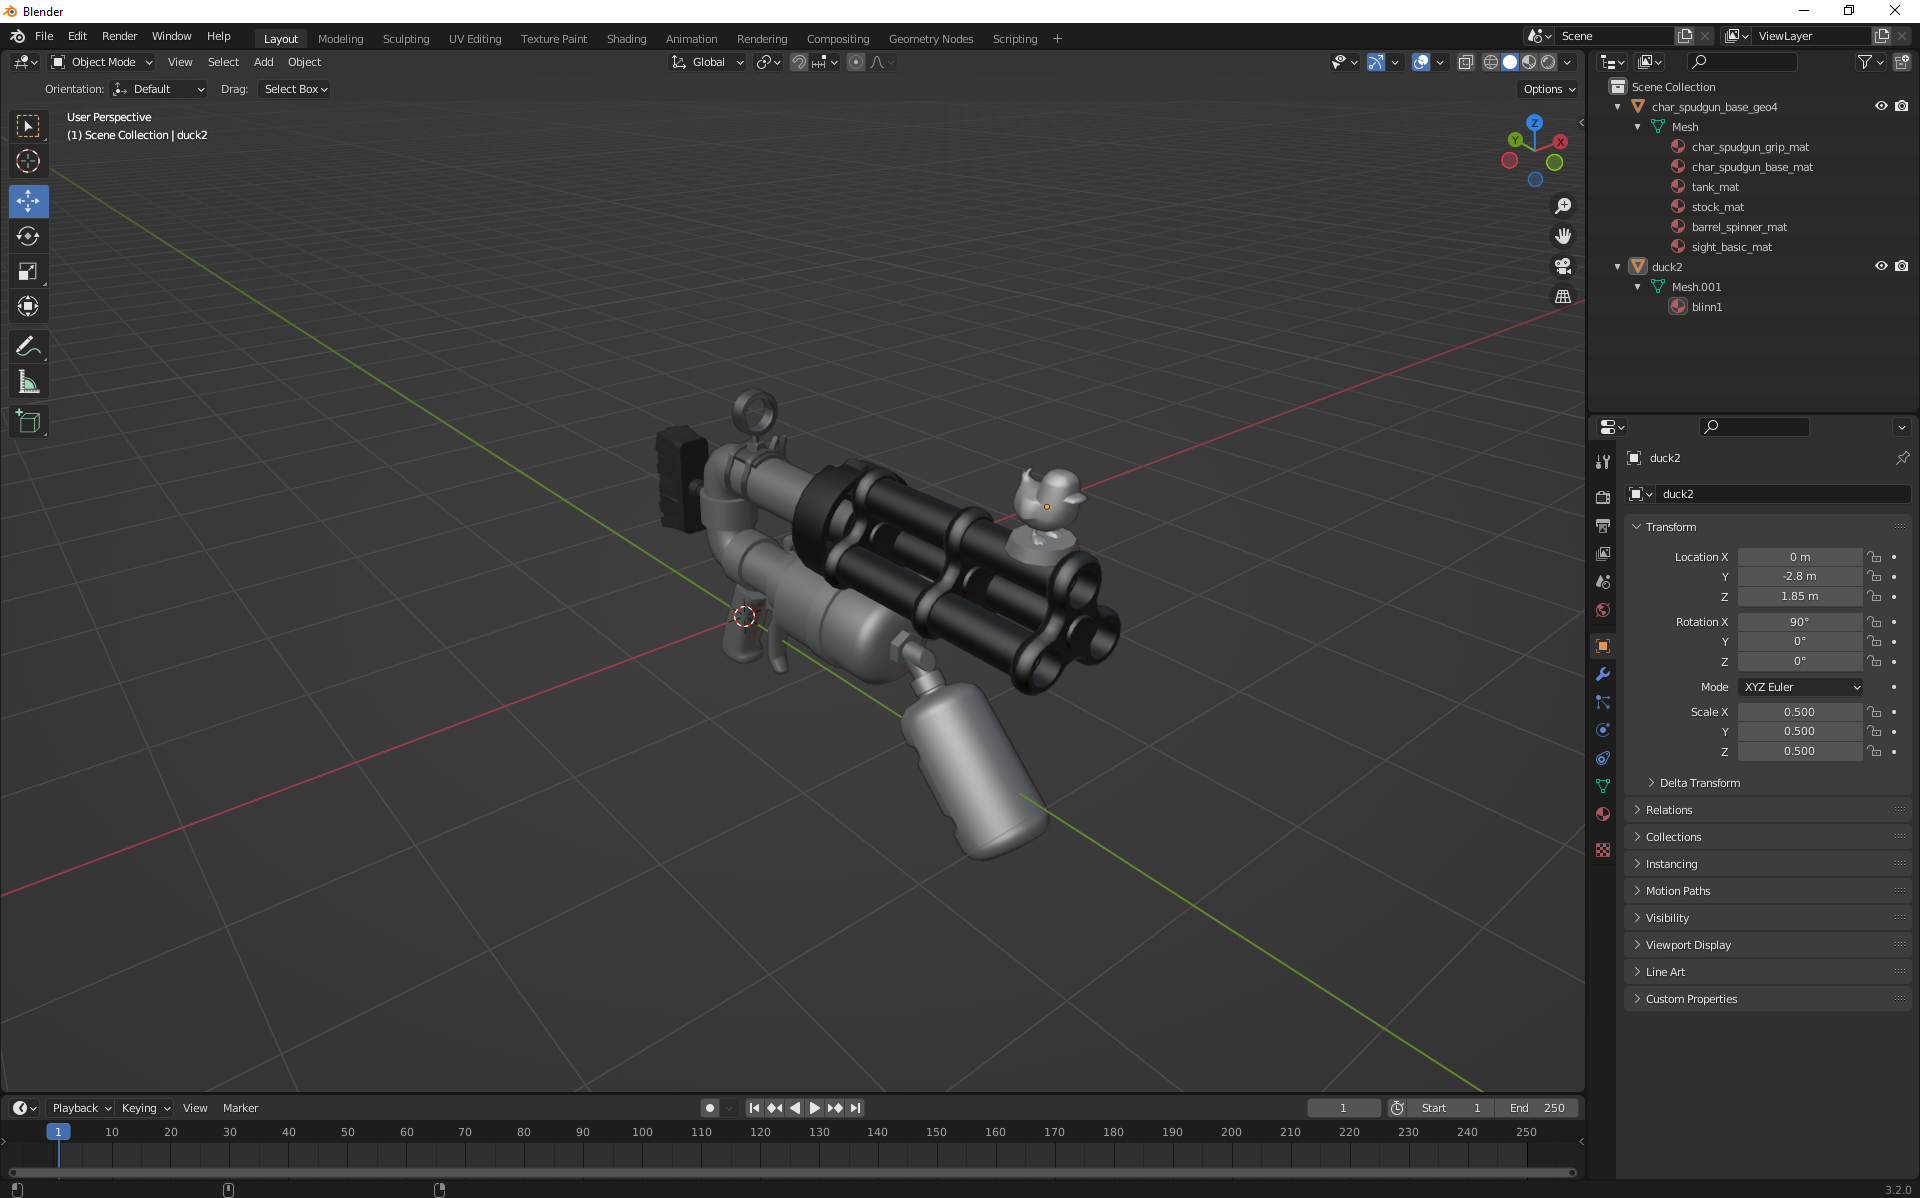
Once again, after importing the preview model and setting the scale to 1,
we import the duck's model and set its scale to 0.5.
Then we move the duck to the same position on the barrel as we did before, like this:
Now, we make sure that the UV maps have the same name,
then we join the duck to the preview model (Hold Shift, select duck, select gun model, right click, click join).
Keep in mind that the object selection order is important - first the custom object (duck), then the gun barrel.
The list at the top right should now look like this:
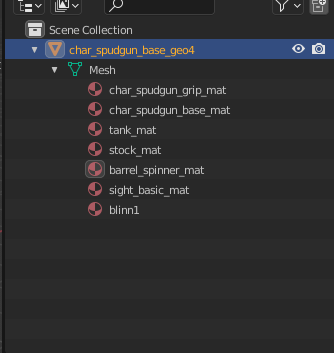
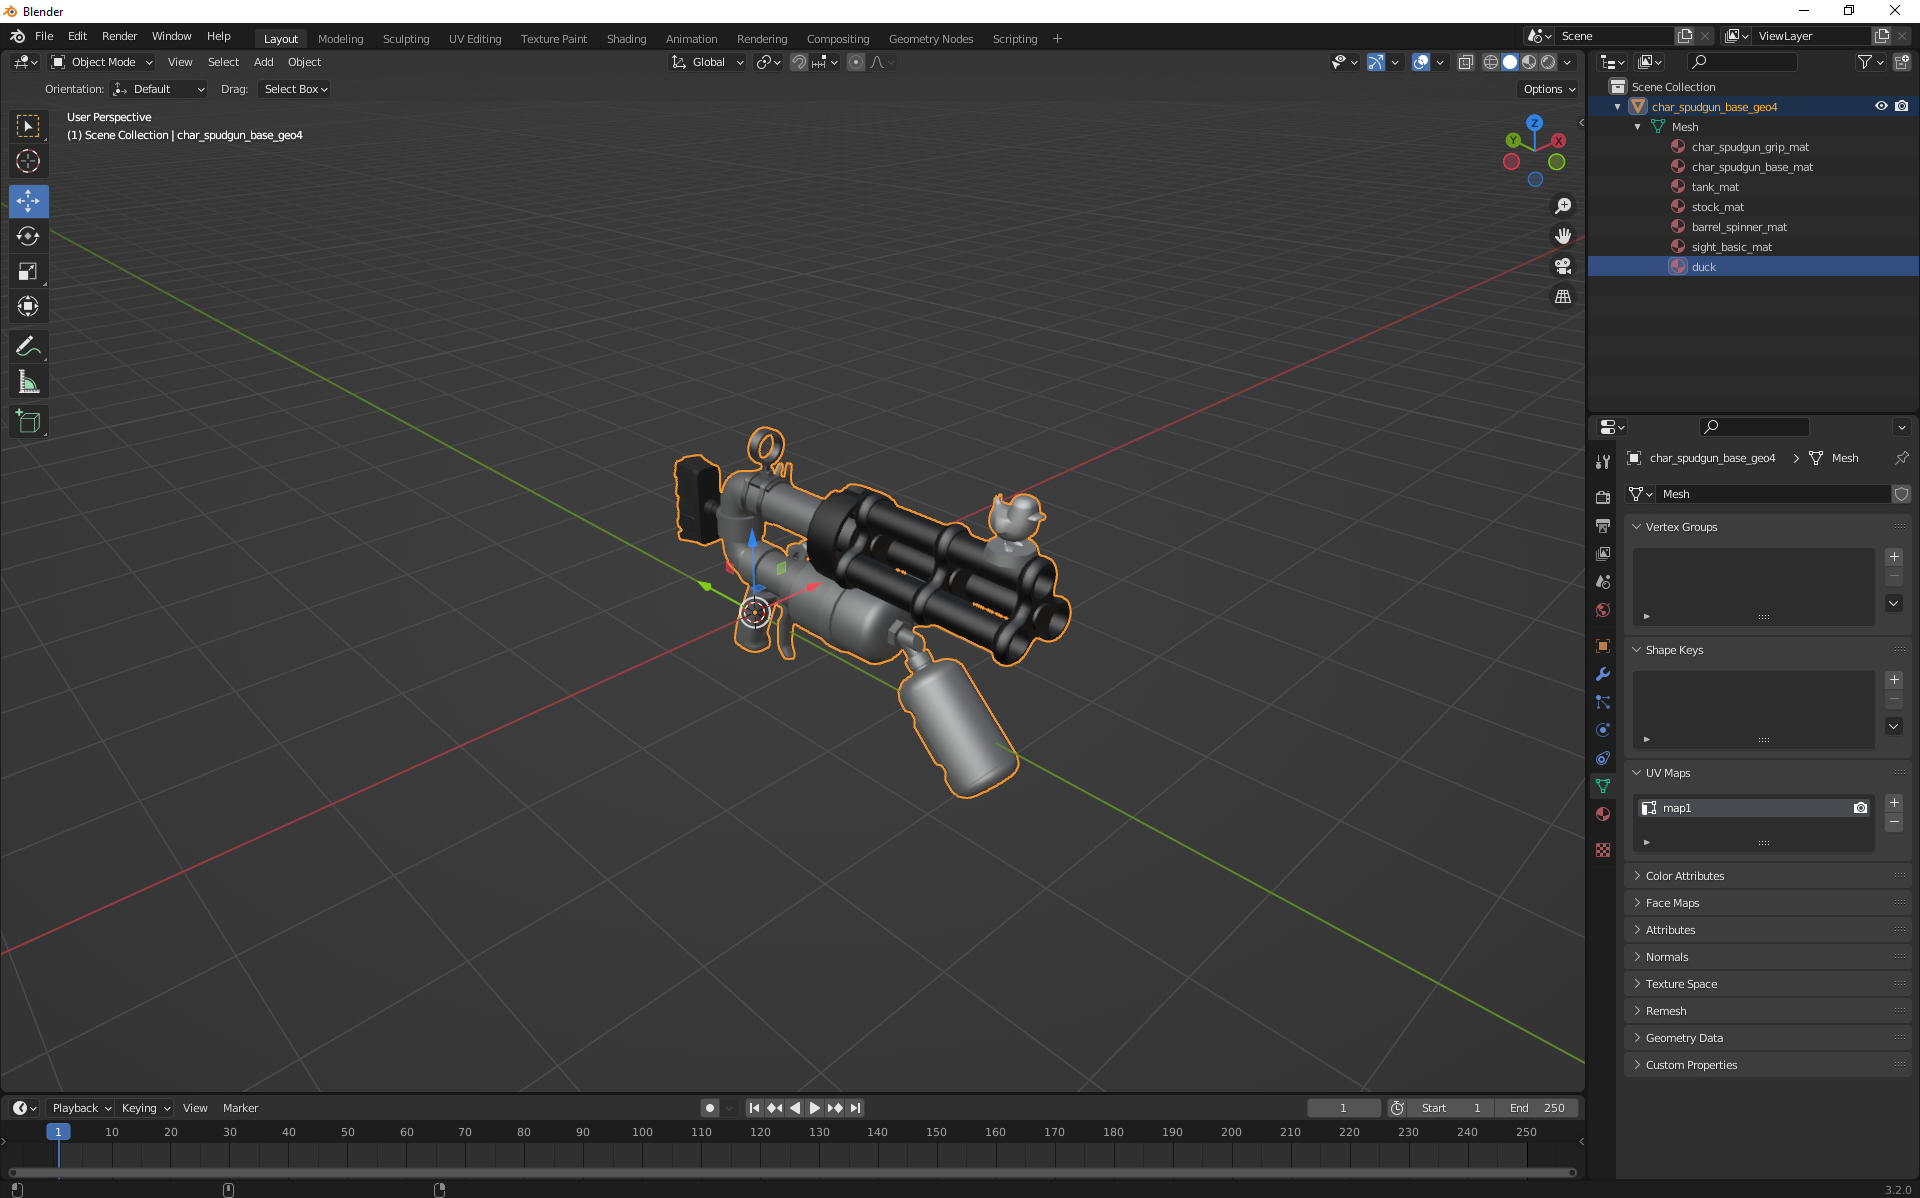
In this list, blinn1 is the duck - let's rename it to something better.
Double-click the blinn1 material to rename it and change its name to duck.
It should now look like this:
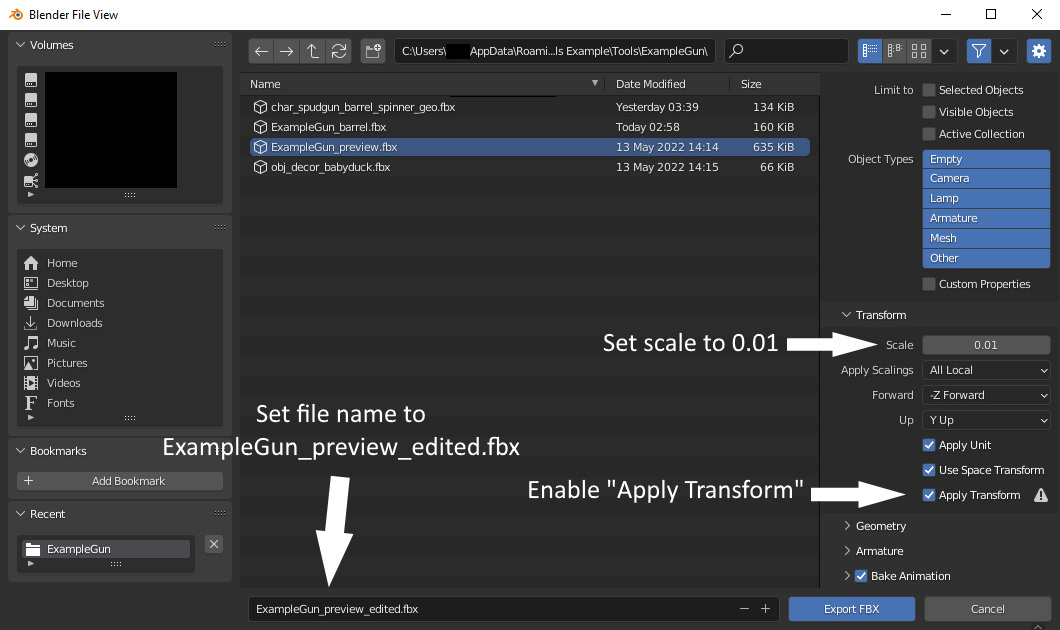
We can now export this edited model - open the export window, open the Mod/Tools/ExampleGun/
folder in it, set the export settings to the ones in the image below and export it.
Setting up the preview renderable#
Now we need to set up the renderable so the game will load our custom preview model.
Open the file Mod/Tools/ExampleGun/ExampleGun_preview.rend in any text/code editor.
It should look like this:
{ "lodList": [ { "subMeshMap": { "char_spudgun_base_mat": { "textureList": [ "$GAME_DATA/Character/Char_Tools/Char_spudgun/Base/char_spudgun_base_dif.tga", "$GAME_DATA/Character/Char_Tools/Char_spudgun/Base/char_spudgun_base_asg.tga", "$GAME_DATA/Character/Char_Tools/Char_spudgun/Base/char_spudgun_base_nor.tga" ], "color": "c98605", "material": "DifAsgNor" }, "char_spudgun_grip_mat": { "textureList": [ "$GAME_DATA/Character/Char_Tools/Char_spudgun/Base/char_spudgun_grip_dif.tga", "$GAME_DATA/Character/Char_Tools/Char_spudgun/Base/char_spudgun_grip_asg.tga", "$GAME_DATA/Character/Char_Tools/Char_spudgun/Base/char_spudgun_grip_nor.tga" ], "color": "c98605", "material": "DifAsgNor" }, "barrel_spinner_mat": { "textureList": [ "$GAME_DATA/Character/Char_Tools/Char_spudgun/Barrel/Barrel_spinner/char_spudgun_barrel_spinner_dif.tga", "$GAME_DATA/Character/Char_Tools/Char_spudgun/Barrel/Barrel_spinner/char_spudgun_barrel_spinner_asg.tga", "$GAME_DATA/Character/Char_Tools/Char_spudgun/Barrel/Barrel_spinner/char_spudgun_barrel_spinner_nor.tga" ], "color": "78211f", "material": "DifAsgNor" }, "sight_basic_mat": { "textureList": [ "$GAME_DATA/Character/Char_Tools/Char_spudgun/Sight/Sight_basic/char_spudgun_sight_basic_dif.tga", "$GAME_DATA/Character/Char_Tools/Char_spudgun/Sight/Sight_basic/char_spudgun_sight_basic_asg.tga", "$GAME_DATA/Character/Char_Tools/Char_spudgun/Sight/Sight_basic/char_spudgun_sight_basic_nor.tga" ], "color": "78211f", "material": "DifAsgNor" }, "stock_mat": { "textureList": [ "$GAME_DATA/Character/Char_Tools/Char_spudgun/Stock/Stock_broom/char_spudgun_stock_broom_dif.tga", "$GAME_DATA/Character/Char_Tools/Char_spudgun/Stock/Stock_broom/char_spudgun_stock_broom_asg.tga", "$GAME_DATA/Character/Char_Tools/Char_spudgun/Stock/Stock_broom/char_spudgun_stock_broom_nor.tga" ], "color": "b9a263", "material": "DifAsgNor" }, "tank_mat": { "textureList": [ "$GAME_DATA/Character/Char_Tools/Char_spudgun/Tank/Tank_basic/char_spudgun_tank_basic_dif.tga", "$GAME_DATA/Character/Char_Tools/Char_spudgun/Tank/Tank_basic/char_spudgun_tank_basic_asg.tga", "$GAME_DATA/Character/Char_Tools/Char_spudgun/Tank/Tank_basic/char_spudgun_tank_basic_nor.tga" ], "color": "c98605", "material": "DifAsgNor" } }, "mesh": "$GAME_DATA/Character/Char_Tools/Char_spudgun/char_spudgun_spinner_preview.fbx" } ]}Here, we have to edit the mesh entry to point to our modified model,
then we add an extra subMesh entry for the duck that we added to the model.
Now, the file should look like this:
{  "lodList": [    {      "subMeshMap": {        "char_spudgun_base_mat": {          "textureList": [            "$GAME_DATA/Character/Char_Tools/Char_spudgun/Base/char_spudgun_base_dif.tga",            "$GAME_DATA/Character/Char_Tools/Char_spudgun/Base/char_spudgun_base_asg.tga",            "$GAME_DATA/Character/Char_Tools/Char_spudgun/Base/char_spudgun_base_nor.tga"          ],          "color": "c98605",          "material": "DifAsgNor"        },        "char_spudgun_grip_mat": {          "textureList": [            "$GAME_DATA/Character/Char_Tools/Char_spudgun/Base/char_spudgun_grip_dif.tga",            "$GAME_DATA/Character/Char_Tools/Char_spudgun/Base/char_spudgun_grip_asg.tga",            "$GAME_DATA/Character/Char_Tools/Char_spudgun/Base/char_spudgun_grip_nor.tga"          ],          "color": "c98605",          "material": "DifAsgNor"        },        "barrel_spinner_mat": {          "textureList": [            "$GAME_DATA/Character/Char_Tools/Char_spudgun/Barrel/Barrel_spinner/char_spudgun_barrel_spinner_dif.tga",            "$GAME_DATA/Character/Char_Tools/Char_spudgun/Barrel/Barrel_spinner/char_spudgun_barrel_spinner_asg.tga",            "$GAME_DATA/Character/Char_Tools/Char_spudgun/Barrel/Barrel_spinner/char_spudgun_barrel_spinner_nor.tga"          ],          "color": "78211f",          "material": "DifAsgNor"        },        "sight_basic_mat": {          "textureList": [            "$GAME_DATA/Character/Char_Tools/Char_spudgun/Sight/Sight_basic/char_spudgun_sight_basic_dif.tga",            "$GAME_DATA/Character/Char_Tools/Char_spudgun/Sight/Sight_basic/char_spudgun_sight_basic_asg.tga",            "$GAME_DATA/Character/Char_Tools/Char_spudgun/Sight/Sight_basic/char_spudgun_sight_basic_nor.tga"          ],          "color": "78211f",          "material": "DifAsgNor"        },        "stock_mat": {          "textureList": [            "$GAME_DATA/Character/Char_Tools/Char_spudgun/Stock/Stock_broom/char_spudgun_stock_broom_dif.tga",            "$GAME_DATA/Character/Char_Tools/Char_spudgun/Stock/Stock_broom/char_spudgun_stock_broom_asg.tga",            "$GAME_DATA/Character/Char_Tools/Char_spudgun/Stock/Stock_broom/char_spudgun_stock_broom_nor.tga"          ],          "color": "b9a263",          "material": "DifAsgNor"        },        "tank_mat": {          "textureList": [            "$GAME_DATA/Character/Char_Tools/Char_spudgun/Tank/Tank_basic/char_spudgun_tank_basic_dif.tga",            "$GAME_DATA/Character/Char_Tools/Char_spudgun/Tank/Tank_basic/char_spudgun_tank_basic_asg.tga",            "$GAME_DATA/Character/Char_Tools/Char_spudgun/Tank/Tank_basic/char_spudgun_tank_basic_nor.tga"          ],          "color": "c98605",          "material": "DifAsgNor"        },
"duck": { "textureList": [ "$GAME_DATA/Objects/Textures/decor/obj_decor_babyduck_dif.tga", "$GAME_DATA/Objects/Textures/decor/obj_decor_babyduck_asg.tga", "$GAME_DATA/Objects/Textures/decor/obj_decor_babyduck_nor.tga" ], "color": "ffd504", "material": "DifAsgNor" } }, "mesh": "$CONTENT_DATA/Tools/ExampleGun/ExampleGun_preview_edited.fbx" } ]}You can save the file like this and launch the game again.
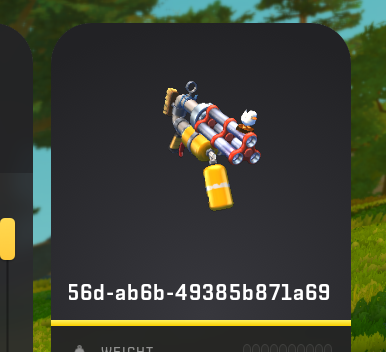
If you did it right, when you hover over the tool in the inventory, it should now show the duck on the gun.
Adding a name, description and icon#
Last but not least, we should add a name, description and inventory icon to our custom gun
so it's no longer invisible in the inventory and has a proper name/description.
The name and description#
Let's first add the inventory description.
Open the file: Mod/Gui/Language/English/inventoryDescriptions.json in any text/code editor.
If you created a new mod, it should only contain a simple {}.
Lets assume we want to give our gun the following information:
- Name:
Example Gun - Description:
A gatling gun with a duck on the barrel, created as an example for the custom tool models tutorial.
Adding this is very easy. All we need is the UUID that we gave the gun in the beginning, the name and the description.
Add them to the file like this:
{ "00000000-0000-0000-0000-000000000000": { "title": "Example Gun", "description": "A gatling gun with a duck on the barrel, created as an example for the custom tool models tutorial." }}title = The name of the gun that is shown in the inventory. description = The description of the gun in the inventory.note
The UUID above is a nil UUID, you need to replace it with the UUID you gave the gun at the beginning.
The icon#
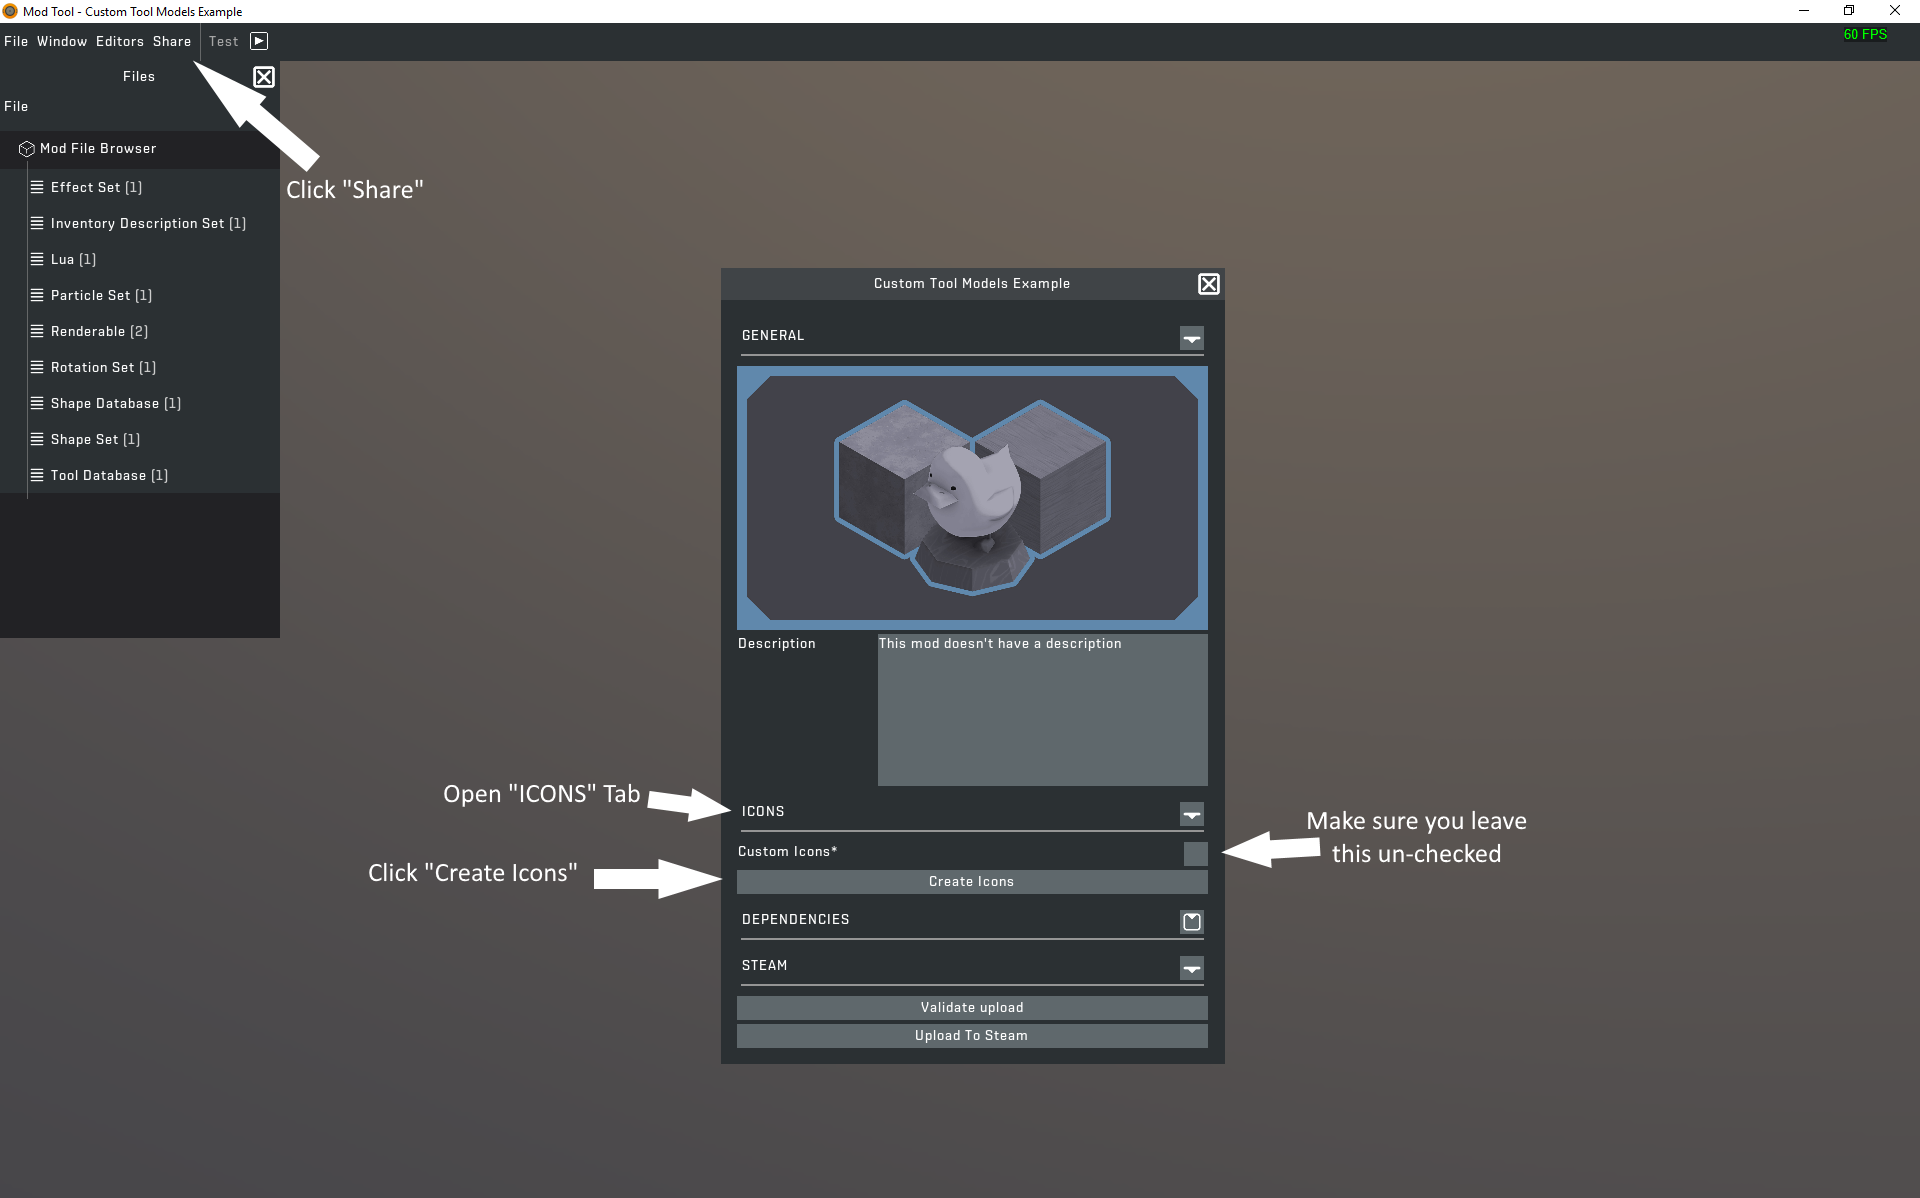
To generate the inventory icon, we need to launch the mod tool and open our mod in it.
Then, at the top left, click on Share.
In the share menu, open the ICONS tab and click on Create Icons.
Make sure that the Custom Icons box is not checked.
Now, we should check a last time that everything is working and being displayed properly in the game.
Launch the game, equip the gun, look at it in the inventory, etc.
It should look like this:
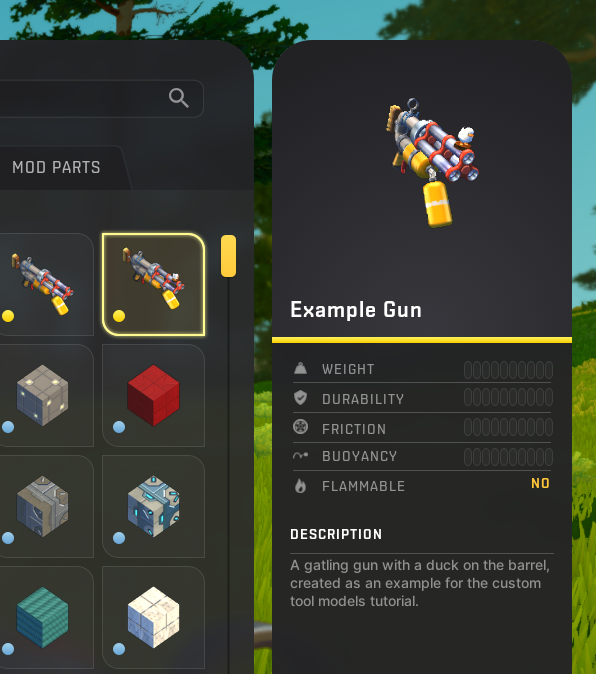
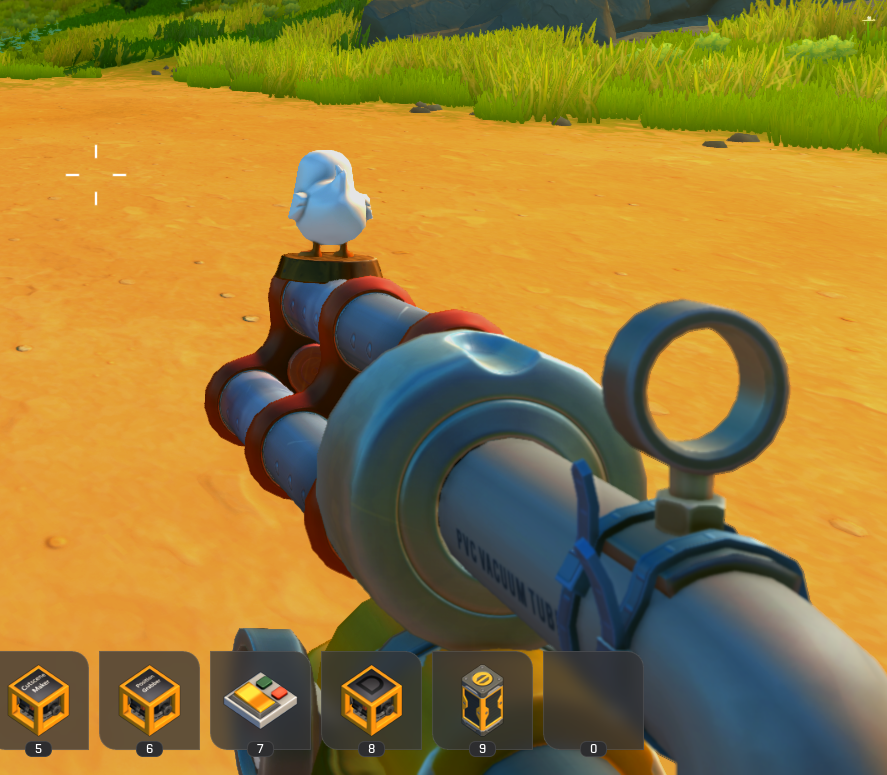
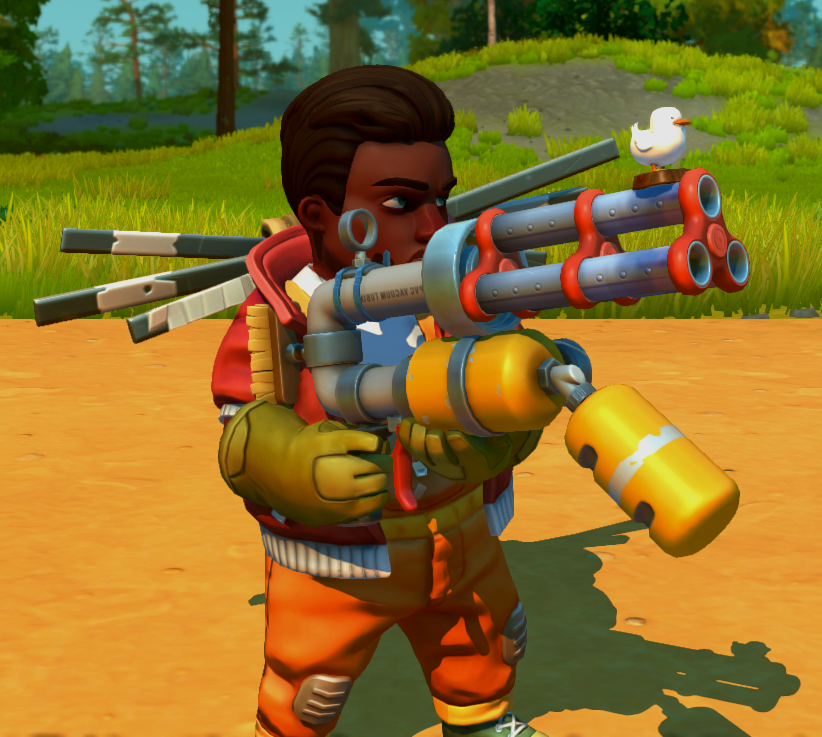
If this is the case, you have successfully created a custom tool model!
You can now apply the things you learned in this tutorial to any other tool model(s),
they should work the same or very similar to what was shown here.
Some problems and their causes#
Below are some specific issues that may occur and possible causes for them.
Most of these issues are usually accompanied by the modified part of the model or the
entire model simply not appearing in the game, while the dev console logs some errors.
The game crashes when I load the mod!#
You probably edited/joined the model(s) wrong or deleted the Armature node in the DAE incorrectly.
ERROR: ...\Skeleton.cpp:177 Could not find root bone: 'Armature' in previously loaded bones#
You deleted the Armature node in the DAE incorrectly.
ERROR: ...Can't find joint: pejnt_barrel (being spammed)#
You probably deleted the Armature node in the DAE incorrectly or edited/joined the model(s) wrong.
The duck is just brown/The texture of my added part isn't loading properly#
You probably didn't rename the UV Map(s) properly.
The new model loads fine, but the added part (e.g. duck) is missing#
You probably forgot/failed to add the subMesh entry to the renderable properly.
Example Mod Download#
Here you can download the example mod that was used to explain everything above.
It contains all required and edited files, exactly the way it's written above.
Feel free to use any part of this mod for your own mod(s).
You can download the mod as ZIP or subscribe to it on the Steam workshop.
Steam Workshop (Browser)
Steam Workshop (Steam Client)
Special thanks#
Special thanks to Holesmak for creating this tutorial video - it
was very helpful while creating this explanation!