How to setup custom audio using the DLM API Extension#
Written below is a tutorial explaining how to setup custom audio in a workshop mod using the DLM API Extension.
In this example we will go through the process of creating a workshop mod that adds a
custom radio part which loads a custom FMOD audio bank and plays sounds from it.
Note that this tutorial assumes that you already know various basic things about creating mods.
Also note that 3D FMOD features are currently NOT implemented in the DLM Audio API, but will
be added in a later DLM update.
An example setup similar to the one shown here can be found in the DLM Code Examples mod.
Table of Contents#
- Required Resources
- Initial Setup
- Creating & Preparing required files and folders
- Creating & Setting up the audio files
- Issues
- I'm getting an error in FMOD Studio
- I'm getting fmod_result 28 or FMOD_ERR_INTERNAL when loading my audio bank
- I'm getting 'File not found' or other Content Path errors
- I'm getting fmod_result 74 or FMOD_ERR_EVENT_NOTFOUND in the 'createEvent' function
- My mod is working for me but not for other players
- I'm getting an 'FMOD API is not loaded!' error
- I'm seeing a 'No user steam ID!' error in the 'loadBank' function
- An API function is returning fmod_result 30 or FMOD_ERR_INVALID_HANDLE
- An API function is returning api_result 3 or 'INVALID_ID'
- Other issues not in this list
Required Resources#
- Software
- Scrap Mechanic
- Scrap Mechanic Mod Tool
- Visual Studio, VS Code or any other program that can edit JSON and Lua files.
- FMOD Studio Version 1.10.05 - Note that other versions will NOT work!
- Files
- Knowledge
- Basic knowledge of JSON files
- Basic knowledge of Scrap Mechanic Lua scripting
- Basic knowledge of where game and mod files are located and how to find them
- Knowing how to add a part to a mod
- Other
- Documentation for the DLM API Extension
Initial Setup#
First, we need to install the DLM API Extension.
Note that the people using your mod will also need to have the extension installed!
Because of this, you should place a notice and link to the extension in the mod's workshop description.
First, we need to create our mod.
You can do so in the Mod Tool.
You probably already know how to do this, so this step is not explained here.
If you do need an explanation, there is one here.
The next step is very important
After creating the mod, we need to upload it to steam right away!
This is not a problem, as a newly uploaded mod is set to private by default.
The reason we need to upload it to steam immediately is that this way, we're immediately
assigning a steam ID to the mod, which we will need later to set some things up.
It also removes the need for an extra mod update to set this up after the mod is done.
Creating & preparing required Files and Folders#
Now we need to add some folders and files to the mod:
First, create a folder called Scripts in the mod.
In this folder, create a new file called Radio.lua.
Then, create a folder called Audio inside the main mod folder.
This folder will later contain our custom audio files.
Next, we need to add our custom radio part to the mod.
We can do so by copying and modifying the radio from the game.
The radio shapeset entry can be found in: Scrap Mechanic/Data/Objects/Database/ShapeSets/interactive.json.
We can find the radio's entry by searching for obj_interactive_radio in this file.
To add this to the mod, all we need to do is add a partList to our mod's shapeset,
copy the radio's shapeset entry into said part list, replace its UUID, remove the legacyId entry
and replace the "radio": {}, property with the following JSON:
"scripted": { "filename": "$CONTENT_DATA/Scripts/Radio.lua", "classname": "Radio"},After doing this, the mod's shapeset should now look something like this:
{ "partList": [ { "uuid": "00000000-0000-0000-0000-000000000000", "name": "obj_interactive_radio", "renderable": "$GAME_DATA/Objects/Renderable/Interactive/obj_interactive_radio.rend", "color": "df7f01", "box": { "x": 2, "y": 2, "z": 1 }, "scripted": { "filename": "$CONTENT_DATA/Scripts/Radio.lua", "classname": "Radio" }, "rotationSet": "PropYZ", "physicsMaterial": "Mechanical", "ratings": { "density": 2, "durability": 3, "friction": 5, "buoyancy": 6 }, "flammable": true } ]}If it does, we can save the file and move on to creating & setting up the actual audio files.
Creating & Setting up the audio files#
First, we need to download FMOD Studio Version 1.10.05 and the Custom Audio FMOD Project.
We need FMOD Studio to generate audio bank files and the Custom Audio project to make said files compatible with DLM.
Note - FMOD Studio versions other than 1.10.05 will NOT work and may cause errors or unexpected behavior!
After installing FMOD Studio, locate the downloaded Custom Audio Project (Custom_Audio_xxxx.zip).
Un-zip this project into any folder, then open the Custom Audio folder in it.
It should look like this:

Next, we open FMOD Studio, click Open Project and select the Custom Audio.fspro file
in the un-zipped Custom Audio folder.
Note - It is extremely important that we use this FMOD project for our custom audio!
If you make a new project, your audio banks will NOT work in the game!
It should look like this (note the name at the top left):
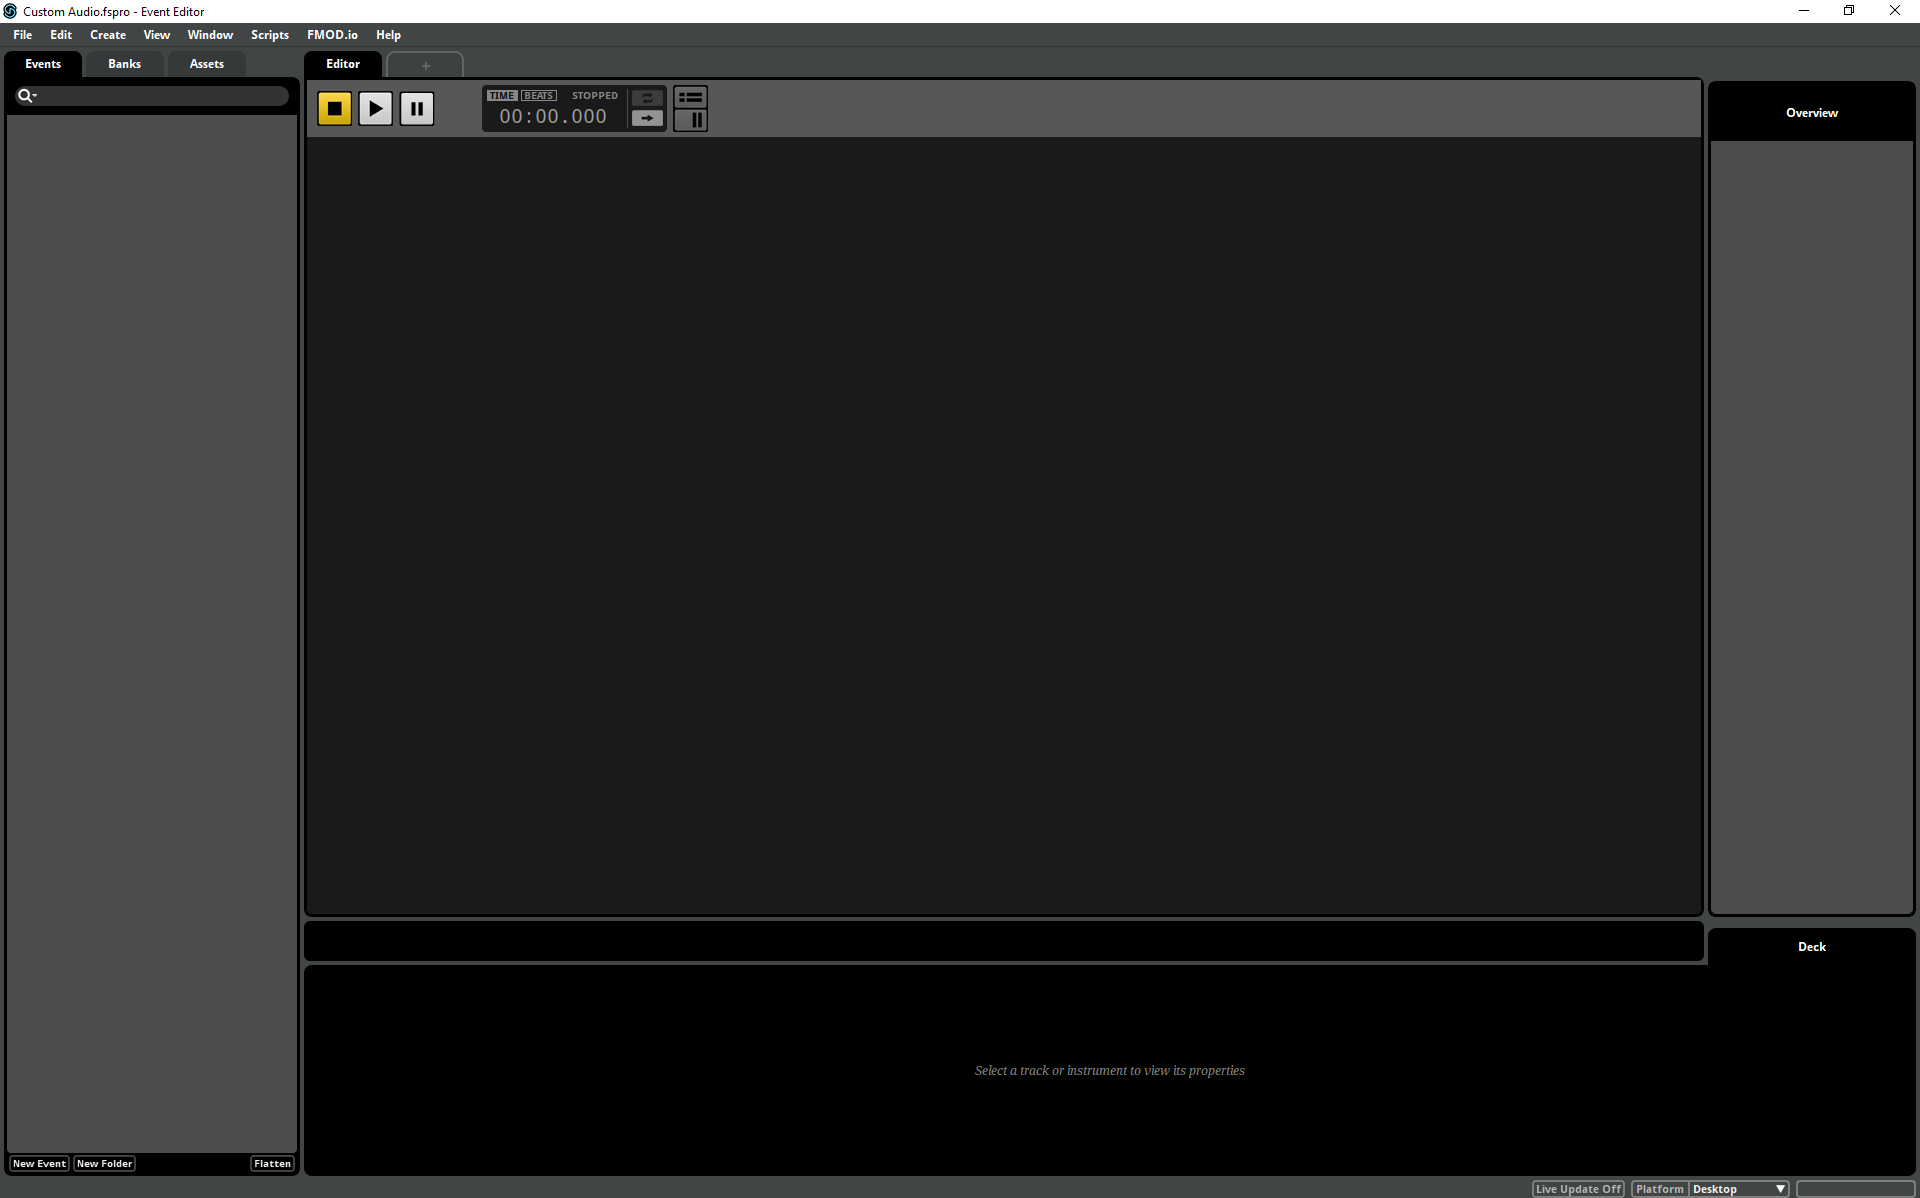
Now we simply take our audio files (e.g. sound.mp3) and drag&drop them into the events list on the left.
note
If there is a popup asking for an Event type and Additional options, make sure to set:
Event typeto3D EventandAdditional optionstoCreate a new event for each audio file.
The list should now look something like this:

If we want to, we can rename the events by double-clicking them.
We open the Banks tab, right-click and create a new bank with the name "MyBank".

Now we go back to the Events tab, select all events in the list,
right-click, select Assign to Bank and select MyBank.
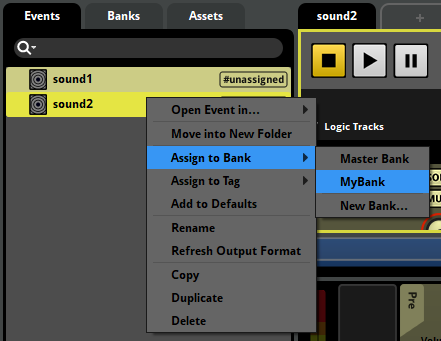
note
It is extremely important that you assign the events to the new bank - NOT the Master Bank!
If you assign them to the Master Bank, you will not be able to load them in the game.
Now, there are two ways to continue:
- The recommended way, creating the bank and a GUIDs.txt file to go with it, so we
can use paths likeevent:/xyzto play our custom sounds later OR - creating the bank without a GUIDs.txt file (not recommended as this prevents us from using event paths)
First we'll go through the recommended way, though the non-recommended way is also explained afterwards.
The recommended way#
The recommended way to continue now is to build our custom audio bank,
then generate a GUIDs.txt file for it and write our Lua script accordingly.
We switch to the Banks tab, right-click on MyBank and click Build....
Then we click on File at the top left and Export GUIDs....
Now we can close FMOD Studio and open the Audio folder in our mod folder and
the Custom Audio Project folder.
Inside the Custom Audio Project folder should be a folder called Build.
Inside this folder should be a folder called Desktop and a file called GUIDs.txt.
We copy the GUIDs.txt file into our mod's Audio folder, then open the Desktop folder.
Inside the Desktop folder should be 3 files:
- A
Master Bank.bankfile - A
Master Bank.strings.bankfile and - A
MyBank.bankfile
We copy only the MyBank.bank file into our mod's Audio folder.
We do not copy the other files, as we can't load them anyways due to a limit of the audio engine.
Now we can start writing the Lua script to load our custom audio bank and play sounds from it.
The Lua Script#
We need a Lua script in order to load the audio bank, the GUIDs.txt file and to actually play custom sounds.
First, we open the Radio.lua file we created at the beginning.
It should still be empty.
Setting up the content path#
In order for DLM to be able to load any files, we need to setup our mod's content path first.
If the content path is not setup, the script will be unable to load the audio bank and GUIDs.txt file.
To do so, we'll make use of the dlm.setupContentPath function.
local mod_name = "DLM Code Examples"local mod_uuid = sm.uuid.new( "00000000-0000-0000-0000-000000000000" )local mod_steamid = 2888172201
dlm.setupContentPath( mod_name, mod_uuid, mod_steamid ) As written in the documentation for the function, the variables mean:
mod_name: The name of our mod's folder (NOT the name in itsdescription.jsonfile - they might be different!).mod_uuid: Our mod'slocalIdfrom itsdescription.json, as a Uuid object.mod_steamid: Our mod's steam file id. It can be found indescription.jsonafter uploading it to steam once.
By immediately uploading our mod after creating it, we made sure that this value exists already.
note
If you did not upload the mod to the steam workshop yet, it will not have a steam file id assigned.
If you want to test your script without a steam id, you can use 0 as a placeholder - however,
you absolutely MUST replace this with the mod's actual steam file id after uploading the mod!
If the steam file id is not properly set, your script will NOT work when your subscribers try using it!
Variables & Utility function#
Next, we create some variables which will later hold our audio bank and audio events representing the sounds in the bank.
We also define a table that keeps track of all instances of our custom radio so when the last radio is destroyed,
we can detect this and un-load the audio bank and events to free some memory (important if the bank is very large).
We also set up a utility function that we'll need later.
local bank      --will later contain an audio bank object
local event_1   --these will later contain audio event objectslocal event_2
local radios = {}   --keeps track of the radio instances
function invert_clamp_scale( min, max, value ) --inverts a value in a number range, clamps it and converts it to another number range local val = max - value return ( val < min and min or ( val > max and max or val ) ) / maxendClass creation & Bank loading#
Then we define the radio class and the client_onCreate function.
In this function, we first add the radio instance to the radios table, then we check
if the audio bank is already loaded.
If the bank is not loaded yet, we use the dlm.audio.loadBank and dlm.audio.createEvent functions
to load the bank and GUIDs.txt file and create audio events from it.
Note that, as written in the documentation, because we loaded our bank together with a GUIDs.txt file, we need
to pass the created AudioBank object to the createEvent function, else it won't be able to find the event.
After loading (or not, if it is already loaded) the bank, we create an EventInstance of each audio event.
Radio = class() --create the class
Radio.poseWeightCount = 1   --pose weight for on/off animation, unrelated to audio
function Radio.client_onCreate( self )  --when a radio instance is created    radios[#radios + 1] = self.interactable --add this instance to the list    if not bank then    --if the audio bank doesn't exist/isn't loaded yet, load it and its events        local api_result, fmod_result, audioBank = dlm.audio.loadBank( "$CONTENT_00000000-0000-0000-0000-000000000000/Audio/MyBank.bank", false, "$CONTENT_00000000-0000-0000-0000-000000000000/Audio/GUIDs.txt" )        assert( api_result == 0 and fmod_result == 0, "Failed to load MyBank!" )
        local api_result, fmod_result, event1 = dlm.audio.createEvent( "event:/sound1", audioBank )        assert( api_result == 0 and fmod_result == 0, "Failed to load event:/sound1!" )
        local api_result, fmod_result, event2 = dlm.audio.createEvent( "event:/sound2", audioBank )        assert( api_result == 0 and fmod_result == 0, "Failed to load event:/sound2!" )
        --assign the variables        bank = audioBank        event_1 = event1        event_2 = event2    end
    local api_result, fmod_result, instance_1 = event_1:createInstance()    --create an instance of the first event    assert( api_result == 0 and fmod_result == 0, "Failed to create first instance!" )
    local api_result, fmod_result, instance_2 = event_2:createInstance()    --create an instance of the second event    assert( api_result == 0 and fmod_result == 0, "Failed to create second instance!" )
    self.sound_1 = instance_1           --load the event instances into self    self.sound_2 = instance_2    self.currentSound = self.sound_1    --select a default sound
self.active = false --not playing by defaultendUpdating the sound#
We use the client_onFixedUpdate function to update the audio system, play/stop
the sound and update the animation of the part depending on its active state.
Note that we need to update the audio system at least every tick if we're using it.
We'll also add some very basic distance/volume scaling, so if the player moves away from the radio,
the sound gets quieter the larger the distance between them is.
function Radio.client_onFixedUpdate( self, dt )    dlm.audio.updateSystem()    --update the audio system - important!
    local api_result, fmod_result, play_state = self.currentSound:getPlaybackState()    if self.active then --if the radio is on        if play_state == 2 then --if the selected sound is currently stopped            self.currentSound:start()   --start the sound        end
        if play_state == 0 then --distance volume scaling - the further away, the quieter it gets            local player = sm.localPlayer.getPlayer()            local playerPos = player.character.worldPosition            local selfPos = self.shape.worldPosition
            local distance = ( playerPos - selfPos ):length() * 4            local volume = invert_clamp_scale( 0, 200, distance - 4 )   --calculate the volume scale, within 4 blocks of radio = volume 1, further than 200 blocks away = volume 0
            self.currentSound:setVolume( volume )   --set the volume according to the distance        end
        self.interactable:setPoseWeight( 0, 1 ) --on/off animation
else --if the radio is off if play_state == 0 then --if the selected sound is currently playing self.currentSound:stop( true ) --stop the sound, immediately end self.interactable:setPoseWeight( 0, 0 ) --on/off animation endendInteraction#
Now we need to add a way to interact with the radio - turning it on/off and changing the sound.
We use client_onInteract to turn it on or off and client_onTinker to change the sound.
We also use the network to sync the on/off change to other players, see other functions.
function Radio.client_onInteract( self, char, lookAt )    if lookAt then        self.active = not self.active        self.network:sendToServer( "sv_n_changeActive", self.active )   --sync the change to other players    endend
function Radio.client_onTinker( self, char, lookAt ) if lookAt then self.currentSound:stop( true ) --make sure the current sound is stopped before switching if self.currentSound == self.sound_1 then self.currentSound = self.sound_2 elseif self.currentSound == self.sound_2 then self.currentSound = self.sound_1 end if self.active then --if the radio is on, immediately start the newly selected sound self.currentSound:start() end --we don't sync the sound change, each player can select a sound for themselves endendDestroying & Unloading the bank#
When a radio is destroyed in some way, we obviously want it to stop playing its music.
However, if the radio being destroyed is the last one, we also want to use that radio
to un-load the audio bank to free some memory since it isn't being used anymore.
The next radio that is placed will notice that the bank is no longer loaded and
will thus load it again.
Note the manual call to updateSystem at the bottom of the function - this is important!
The reason is, if the destroyed instance was the last instance, client_onFixedUpdate will not
get called anymore, which means the audio system would not update after this function, which means
the sound may not stop properly. A manual call to updateSystem fixes this.
function Radio.client_onDestroy( self )    for k, radio in pairs( radios ) do        if radio == self.interactable then  --remove this radio from the list since it doesn't exist anymore            table.remove( radios, k )        end    end    self.sound_1:destroy()  --destroy the sound event instances of this radio    self.sound_2:destroy()
if #radios == 0 then --this was the last one, no more radios exist in the game world event_1:destroy() --unload/destroy the events and audio bank event_2:destroy() bank:destroy() event_1 = nil --set the variables to nil so that a new radio can properly see that they were unloaded event_2 = nil bank = nil end dlm.audio.updateSystem() --important! If this was the last radio, onFixedUpdate does not get called after this. --This means that we have to manually update the system once here so it actually stops & destroys the sounds.endOther functions#
Below are some other functions that are unrelated to the actual audio,
like on/off syncing and setting a fancy interaction text.
function Radio.client_canInteract( self )   --set the interaction text    local use = sm.gui.getKeyBinding( "Use", true )    local tinker = sm.gui.getKeyBinding( "Tinker", true )
    if not self.parent then        sm.gui.setInteractionText( "", use, "Turn " .. ( self.active and "off" or "on" ) )    end    sm.gui.setInteractionText( "", tinker, "Change Sound" )
    return true, trueend
--on/off state syncfunction Radio.sv_n_changeActive( self, state, player )    self.network:sendToClients( "cl_n_changeActive", state )end
function Radio.cl_n_changeActive( self, state ) self.active = stateendThe finished script#
If we combine all of this, we should end up with a script that looks like this:
local mod_name = "DLM Code Examples"local mod_uuid = sm.uuid.new( "00000000-0000-0000-0000-000000000000" )local mod_steamid = 2888172201
dlm.setupContentPath( mod_name, mod_uuid, mod_steamid )
local bank      --will later contain an audio bank object
local event_1   --these will later contain audio event objectslocal event_2
local radios = {}   --keeps track of the radio instances
function invert_clamp_scale( min, max, value )  --inverts a value in a number range, clamps it and converts it to another number range    local val = max - value    return ( val < min and min or ( val > max and max or val ) ) / maxend
Radio = class() --create the class
Radio.poseWeightCount = 1   --pose weight for on/off animation, unrelated to audio
function Radio.client_onCreate( self )  --when a radio instance is created    radios[#radios + 1] = self.interactable --add this instance to the list    if not bank then    --if the audio bank doesn't exist/isn't loaded yet, load it and its events        local api_result, fmod_result, audioBank = dlm.audio.loadBank( "$CONTENT_00000000-0000-0000-0000-000000000000/Audio/MyBank.bank", false, "$CONTENT_00000000-0000-0000-0000-000000000000/Audio/GUIDs.txt" )        assert( api_result == 0 and fmod_result == 0, "Failed to load MyBank! api_result was:", dlm.constants.audio.api_results[api_result], ", fmod_result was:", dlm.constants.audio.fmod_results[fmod_result] )
        local api_result, fmod_result, event1 = dlm.audio.createEvent( "event:/sound1", audioBank )        assert( api_result == 0 and fmod_result == 0, "Failed to load event:/sound1! api_result was:", dlm.constants.audio.api_results[api_result], ", fmod_result was:", dlm.constants.audio.fmod_results[fmod_result] )
        local api_result, fmod_result, event2 = dlm.audio.createEvent( "event:/sound2", audioBank )        assert( api_result == 0 and fmod_result == 0, "Failed to load event:/sound2! api_result was:", dlm.constants.audio.api_results[api_result], ", fmod_result was:", dlm.constants.audio.fmod_results[fmod_result] )
        --assign the variables        bank = audioBank        event_1 = event1        event_2 = event2    end
    local api_result, fmod_result, instance_1 = event_1:createInstance()    --create an instance of the first event    assert( api_result == 0 and fmod_result == 0, "Failed to create first instance! api_result was:", dlm.constants.audio.api_results[api_result], ", fmod_result was:", dlm.constants.audio.fmod_results[fmod_result] )
    local api_result, fmod_result, instance_2 = event_2:createInstance()    --create an instance of the second event    assert( api_result == 0 and fmod_result == 0, "Failed to create second instance! api_result was:", dlm.constants.audio.api_results[api_result], ", fmod_result was:", dlm.constants.audio.fmod_results[fmod_result] )
    self.sound_1 = instance_1           --load the event instances into self    self.sound_2 = instance_2    self.currentSound = self.sound_1    --select a default sound
    self.active = false --not playing by defaultend
function Radio.client_onFixedUpdate( self, dt )    dlm.audio.updateSystem()    --update the audio system - important!
    local api_result, fmod_result, play_state = self.currentSound:getPlaybackState()    if self.active then --if the radio is on        if play_state == 2 then --if the selected sound is currently stopped            self.currentSound:start()   --start the sound        end
        if play_state == 0 then --distance volume scaling - the further away, the quieter it gets            local player = sm.localPlayer.getPlayer()            local playerPos = player.character.worldPosition            local selfPos = self.shape.worldPosition
            local distance = ( playerPos - selfPos ):length() * 4            local volume = invert_clamp_scale( 0, 200, distance - 4 )   --calculate the volume scale, within 4 blocks of radio = volume 1, further than 200 blocks away = volume 0
            self.currentSound:setVolume( volume )   --set the volume according to the distance        end
        self.interactable:setPoseWeight( 0, 1 ) --on/off animation
    else    --if the radio is off        if play_state == 0 then --if the selected sound is currently playing            self.currentSound:stop( true )  --stop the sound, immediately        end        self.interactable:setPoseWeight( 0, 0 ) --on/off animation    endend
function Radio.client_onInteract( self, char, lookAt )    if lookAt then        self.active = not self.active        self.network:sendToServer( "sv_n_changeActive", self.active )   --sync the change to other players    endend
function Radio.client_onTinker( self, char, lookAt )    if lookAt then        self.currentSound:stop( true )  --make sure the current sound is stopped before switching        if self.currentSound == self.sound_1 then            self.currentSound = self.sound_2        elseif self.currentSound == self.sound_2 then            self.currentSound = self.sound_1        end        if self.active then --if the radio is on, immediately start the newly selected sound            self.currentSound:start()        end        --we don't sync the sound change, each player can select a sound for themselves    endend
function Radio.client_onDestroy( self )    for k, radio in pairs( radios ) do        if radio == self.interactable then  --remove this radio from the list since it doesn't exist anymore            table.remove( radios, k )        end    end    self.sound_1:destroy()  --destroy the sound event instances of this radio    self.sound_2:destroy()
    if #radios == 0 then    --this was the last one, no more radios exist in the game world        event_1:destroy()   --unload/destroy the events and audio bank        event_2:destroy()        bank:destroy()        event_1 = nil   --set the variables to nil so that a new radio can properly see that they were unloaded        event_2 = nil        bank = nil    end    dlm.audio.updateSystem()    --important! If this was the last radio, onFixedUpdate does not get called after this.    --This means that we have to manually update the system once here so it actually stops & destroys the sounds.end
function Radio.client_canInteract( self )   --set the interaction text    local use = sm.gui.getKeyBinding( "Use", true )    local tinker = sm.gui.getKeyBinding( "Tinker", true )
    if not self.parent then        sm.gui.setInteractionText( "", use, "Turn " .. ( self.active and "off" or "on" ) )    end    sm.gui.setInteractionText( "", tinker, "Change Sound" )
    return true, trueend
--on/off state syncfunction Radio.sv_n_changeActive( self, state, player )    self.network:sendToClients( "cl_n_changeActive", state )end
function Radio.cl_n_changeActive( self, state ) self.active = stateendIf we did everything right, when we place the radio in-game and interact with it, our custom
audio should start playing. When we tinker (U) with it, it should change the selected sound.
The non-recommended way#
note
If you followed the The recommended way section above, you can skip ahead to (Issues).
We can also generate only our audio bank and not use a GUIDs.txt file.
This way is not recommended as it is not as easy to use and (due to event names being missing)
makes the Lua script a bit harder to read/understand for others.
There are only a few differences between the recommended version and the non-recommended one, so I will only
list the changed parts and not an entire, separate explanation.
When building the audio bank in FMOD Studio, we do not export a GUIDs.txt file.
In the Lua script, when we define the Radio class and client_onCreate function, we do some things slightly different:
We do not pass a GUIDs.txt file to the dlm.audio.loadBank function and the dlm.audio.createEvent function
receives the event's GUID as a string (written as {00000000-0000-0000-0000-000000000000}) instead of the event's path name.
We also do not pass the audio bank object to createEvent.
Radio = class() --create the class
Radio.poseWeightCount = 1   --pose weight for on/off animation, unrelated to audio
function Radio_1.client_onCreate( self )    --when a radio instance is created    radios[#radios + 1] = self.interactable --add this instance to the list    if not bank then    --if the audio bank doesn't exist/isn't loaded yet, load it and its events        local api_result, fmod_result, audioBank = dlm.audio.loadBank( "$CONTENT_00000000-0000-0000-0000-000000000000/Audio/MyBank.bank", false )        assert( api_result == 0 and fmod_result == 0, "Failed to load MyBank!" )
        local api_result, fmod_result, event1 = dlm.audio.createEvent( "{bea84618-2959-43ce-8a7d-719d5eb29f15}" )        assert( api_result == 0 and fmod_result == 0, "Failed to load event:/sound1!" )
        local api_result, fmod_result, event2 = dlm.audio.createEvent( "{36231491-3575-4053-b69b-41e9d804b549}" )        assert( api_result == 0 and fmod_result == 0, "Failed to load event:/sound2!" )
        --assign the variables        bank = audioBank        event_1 = event1        event_2 = event2    end
    local api_result, fmod_result, instance_1 = event_1:createInstance()    --create an instance of the first event    assert( api_result == 0 and fmod_result == 0, "Failed to create first instance!" )
    local api_result, fmod_result, instance_2 = event_2:createInstance()    --create an instance of the second event    assert( api_result == 0 and fmod_result == 0, "Failed to create second instance!" )
    self.sound_1 = instance_1           --load the event instances into self    self.sound_2 = instance_2    self.currentSound = self.sound_1    --select a default sound
self.active = false --not playing by defaultendThe rest of the script stays the same.
Issues#
Listed below are some issues that may occur and what you can try to fix them.
I'm getting an error in FMOD Studio#
Unfortunately I can't help with that, as I don't have enough experience with FMOD Studio.
You can try googling the error or asking other modders about it.
Also, make sure you're using the correct FMOD Studio version - it must be version 1.10.05!
I'm getting an FMOD_ERROR_INTERNAL when loading my custom bank file#
Make sure you used the correct FMOD Studio version to create the file - versions
other than 1.10.05 will not work!
I'm getting 'File not Found' or other Content Path errors#
Make sure you set up the content path correctly.
Also, make sure the path to file you're trying to load is valid.
If you believe you did everything correctly, you can contact me and ask for help.
I'm getting an 'Event not found' error in the 'createEvent' function#
Make sure you're using the function correctly - if you loaded your audio bank with a GUIDs.txt file and want to
use an event path name to create the event, you need to pass the AudioBank object into the createEvent function.
If you loaded your audio bank without a GUIDs.txt file, you cannot use an event path name to create an event.
You have to use the event's GUID string as the name and must NOT pass the AudioBank object to the function.
If you can't figure it out, feel free to ask for help.
The mod is working for me but not for other players#
You probably set the mod's steam file id in the setupContentPath function incorrectly.
Make sure the steam file id is correct.
Also, know that the other players need to have the DLM API Extension installed in order to use the mod.
I'm getting an 'FMOD API is not loaded!' error#
The internal FMOD API in DLM failed to load for some reason.
Please report this immediately.
I'm seeing a 'No user steam ID!' error in the 'loadBank' function#
For some reason, DLM failed to find your steam ID.
The steam ID is needed to resolve mod file paths properly.
Make sure that a steam_appid.txt file exists next to your ScrapMechanic.exe and
that said file contains the text: 387990 (and nothing else).
If the file is there and the error still appears, please report this issue.
An API function is returning fmod_result 30 or FMOD_ERR_INVALID_HANDLE#
This is an internal error in the API - something that I (the DLM developer) have to fix myself.
If this happens, please report it immediately!
An API function is returning api_result 3 or 'INVALID_ID'#
Just like the error above, this should not happen and I have to fix it myself.
If this happens, please report it immediately!
Other errors not in this list#
If you're getting other errors, unexpected behavior, etc., there are four ways to ask about them.